ISO: As LOW AS POSSIBLE BUT AS HIGH AS NECESSARY - Understanding noise in your photography
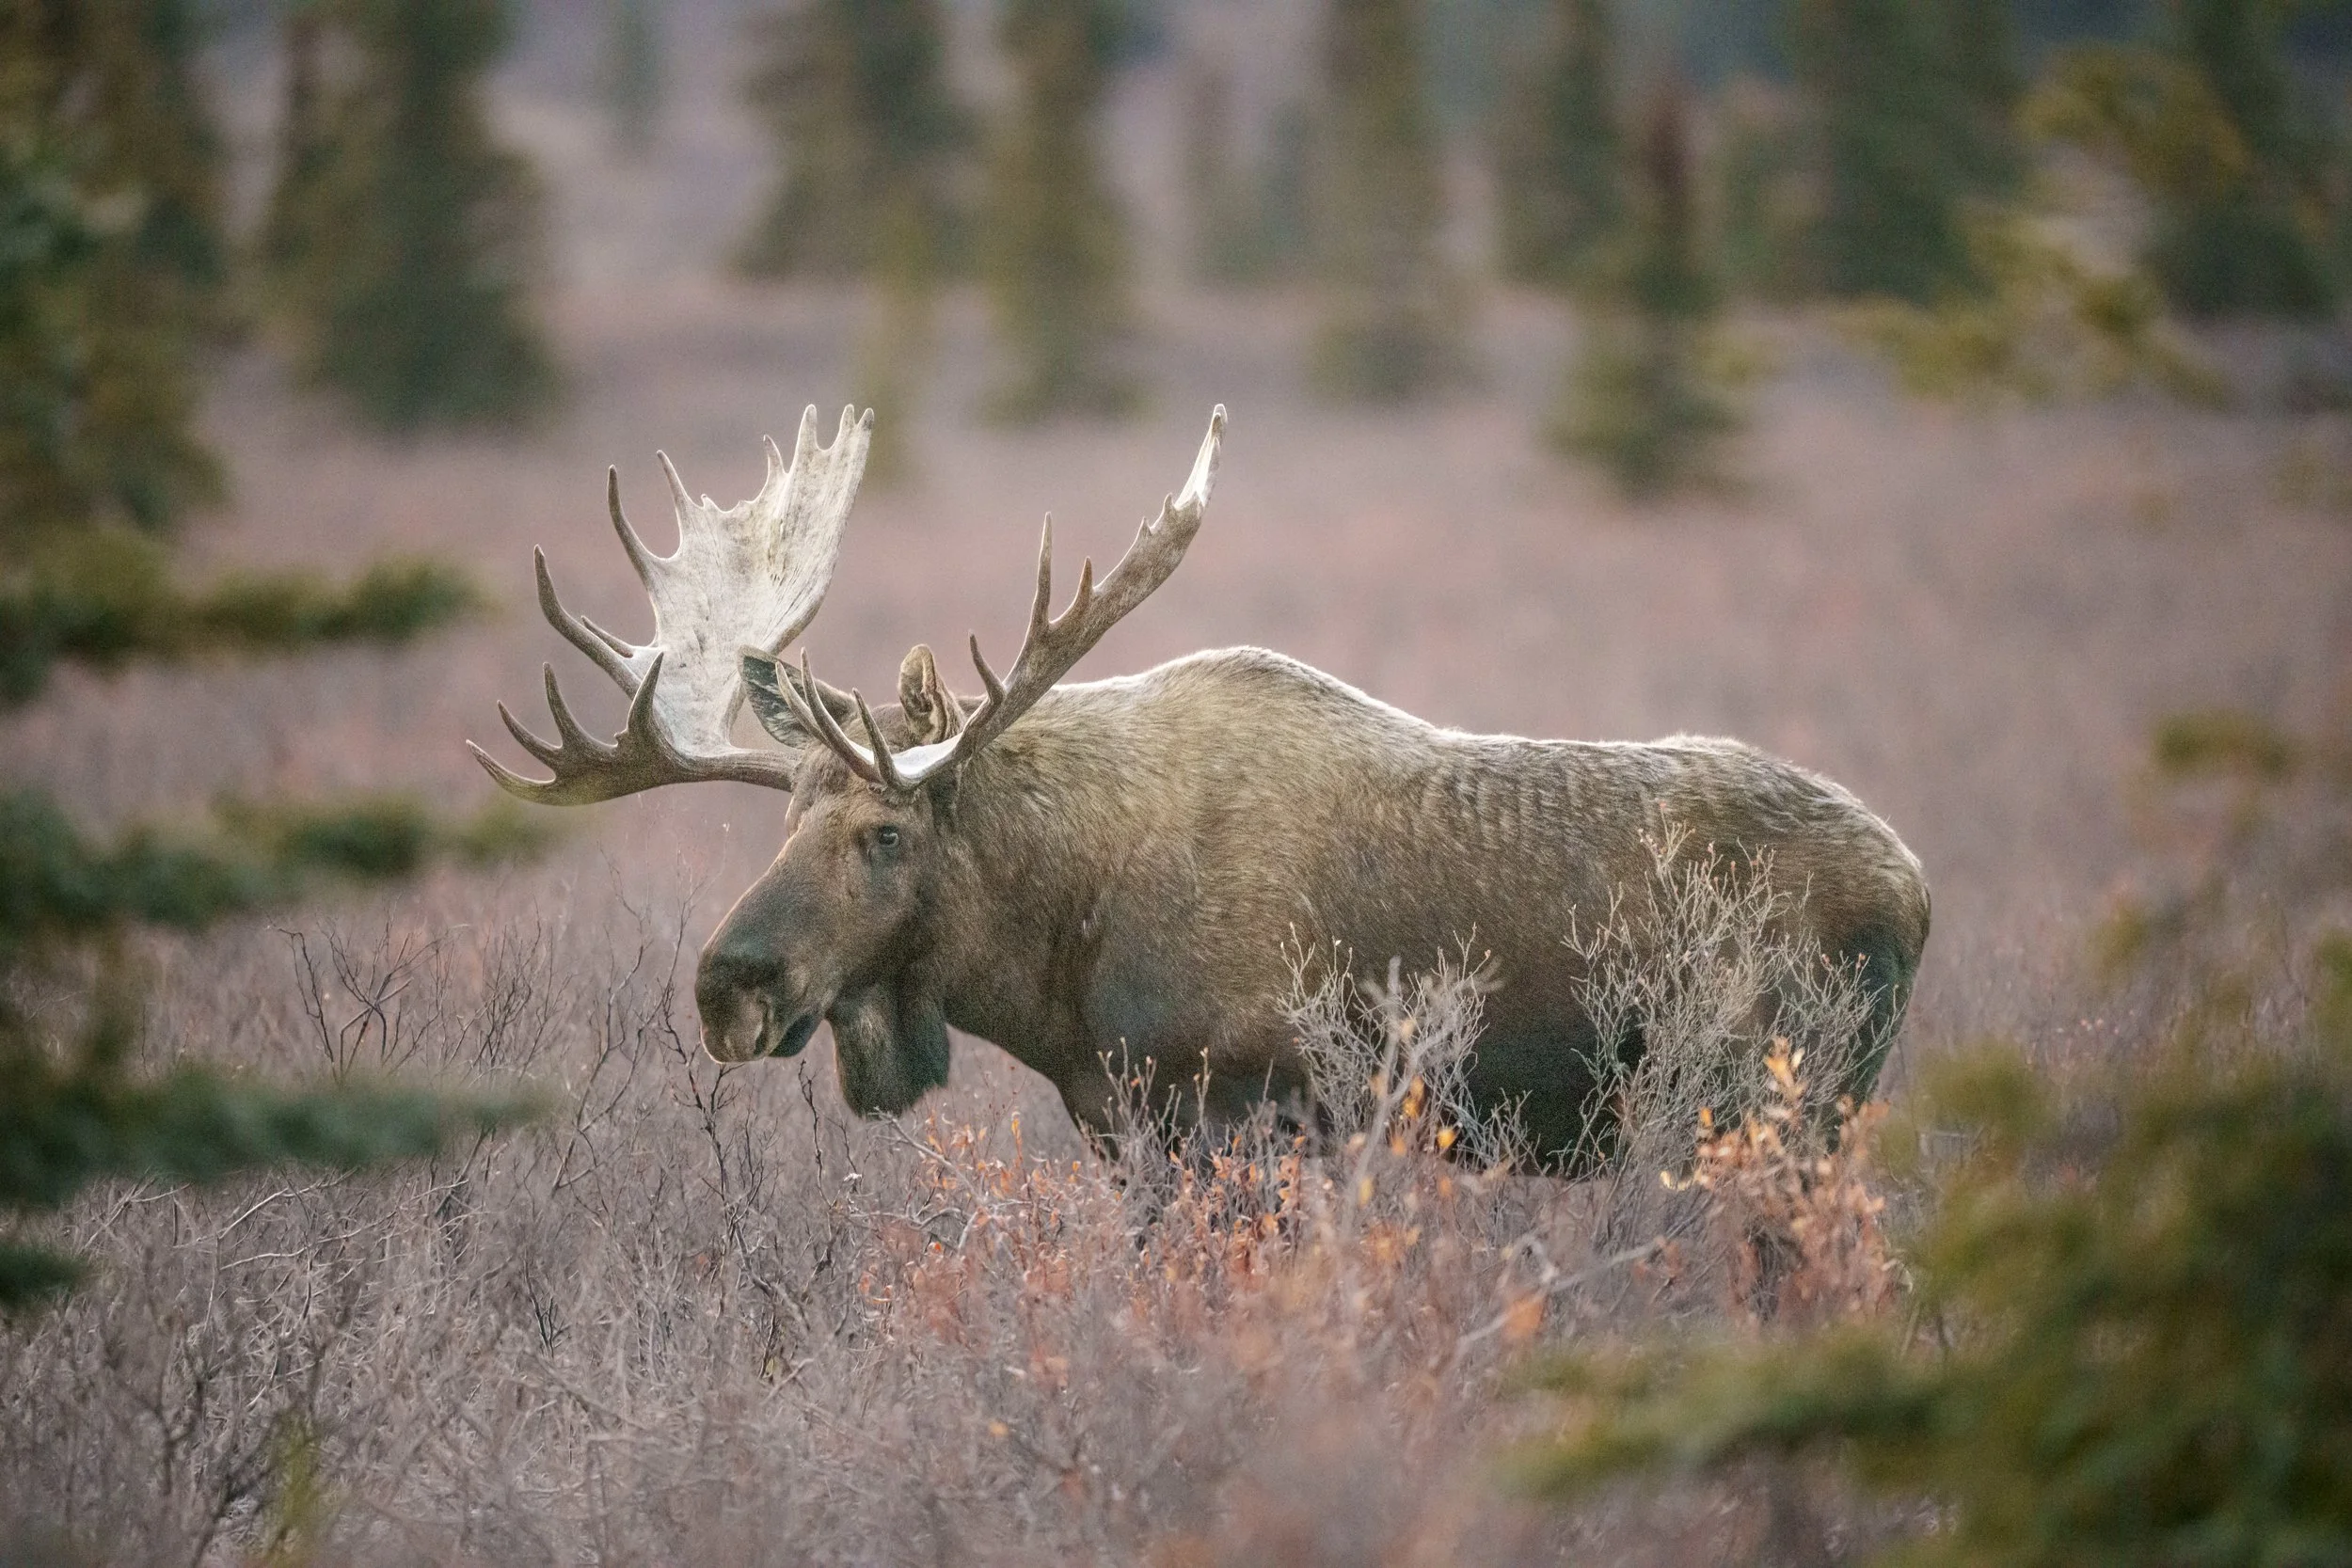
I photographed this bull moose in Denali National Park at ISO 25,600 and did not use any AI program like Topaz or even Lightroom’s AI Denoise. This image was edited with just a couple tweaks of the sliders. Read on to see why pushing your ISO will introduce less noise than trying to “fix” an underexposed image in post.
If you’ve spent any time in online communities for wildlife photographers, you’ve likely come across discussions—if not outright frustrations—about noise. This grainy texture, often most noticeable in low-light conditions, can detract from an otherwise striking image. While noise-reduction software has become increasingly sophisticated, relying solely on artificial intelligence to clean up an image treats only the symptom, not the cause.
Understanding how noise is introduced—and more importantly, how to minimize it in-camera—will elevate the quality of your photography, whether or not you choose to apply post-processing tools.
Personally, I find that a proper exposure in-camera and some sliders in Lightroom is all I need for my work. I don’t use anything like Topaz or Lightroom’s built-in AI tools, though I’ve played around with it to test the waters. While I see the appeal of this type of software, I find the artifacts it leaves behind on my images are far more distracting and problematic than anything it “fixes,” especially when those images are printed. Since I sell my work and it’s printed in magazines and other media, I prefer getting it right in-camera and spending under 5 minutes post-processing every image I keep.
Working with the highest quality and best possible file will always help you create the highest quality and best possible final product when you post-process your photograph.
The Two Types of Noise: Luminance Noise and Color Noise
It’s important to understand that there are two different types of noise photographers will see in their images: luminance noise and color noise. They both look “grainy” in images, but they both stem from the same thing: a lack of information (lack of light). That is ALL that noise is - a lack of information.
Luminance noise shows itself in photos as the “dark grains” in our highlights or the “light grains” in our shadows. The lack of information in those pixels is created from under or over-exposed highlights and shadows.
Color noise, sometimes referred to as chromatic noise, usually shows up in the shadows and is represented by the little rainbow of pixels you might see dotting itself around in those darker spots. This is almost always caused by underexposure.
The Myth of Low ISO: Why Underexposure Creates More Noise
A widely held, yet misguided belief among photographers, is that maintaining the lowest possible ISO is the key to reducing noise. This often leads them to deliberately underexpose their images in an attempt to avoid higher ISO settings, only to compensate by brightening the image in post-processing. Ironically, this strategy frequently has the opposite effect, as increasing exposure in post-production amplifies noise more aggressively than if the image had been correctly exposed at a higher ISO to begin with.
At its core, digital photography is about recording light—more precisely, capturing as much light-based information as possible. A camera sensor’s ability to produce clean, detailed images is directly tied to the quantity of light it receives. When photographers underexpose due to an aversion to higher ISO values, they are not preserving image quality but rather restricting the sensor’s ability to gather sufficient information. This lack of data is the true culprit behind excessive noise in low-light conditions—not ISO itself.
Rather than prioritizing an arbitrarily low ISO, photographers should instead focus on achieving optimal exposure in-camera, ensuring the sensor collects the maximum amount of light available in the scene. Modern camera technology has significantly improved ISO performance, and especially so with the constant boundary-pushing that mirrorless cameras have brought into play. I regularly, REGULARLY, find myself photographing at ISO 20,000 or ISO 25,600 as a professional wildlife photographer, without overly noisy images and without needing to AI the hell out of every frame to make it somewhat palatable. These images sell to magazines, creative directors, and art buyers every single month at those ISOs - they are beyond usable.
By understanding their equipment’s capabilities and pushing ISO when necessary, photographers can consistently produce cleaner, more detailed images—even in challenging lighting conditions. And how? By MASTERING the histogram!
The Histogram: Your Most Powerful Tool for Mastering Photo Exposure
The best tool for ensuring optimal exposure is the histogram—a graphical representation of the tonal distribution in an image. While traditional DSLRs required photographers to take a shot and then review the histogram, modern mirrorless cameras allow you to see this data in real-time within the viewfinder.
Why does this matter?
Because 50% of the total information a digital camera captures is contained in the brightest 20% of the histogram—the far-right side. Underexposing by even a single stop can mean losing nearly half of the data the sensor is capable of recording.
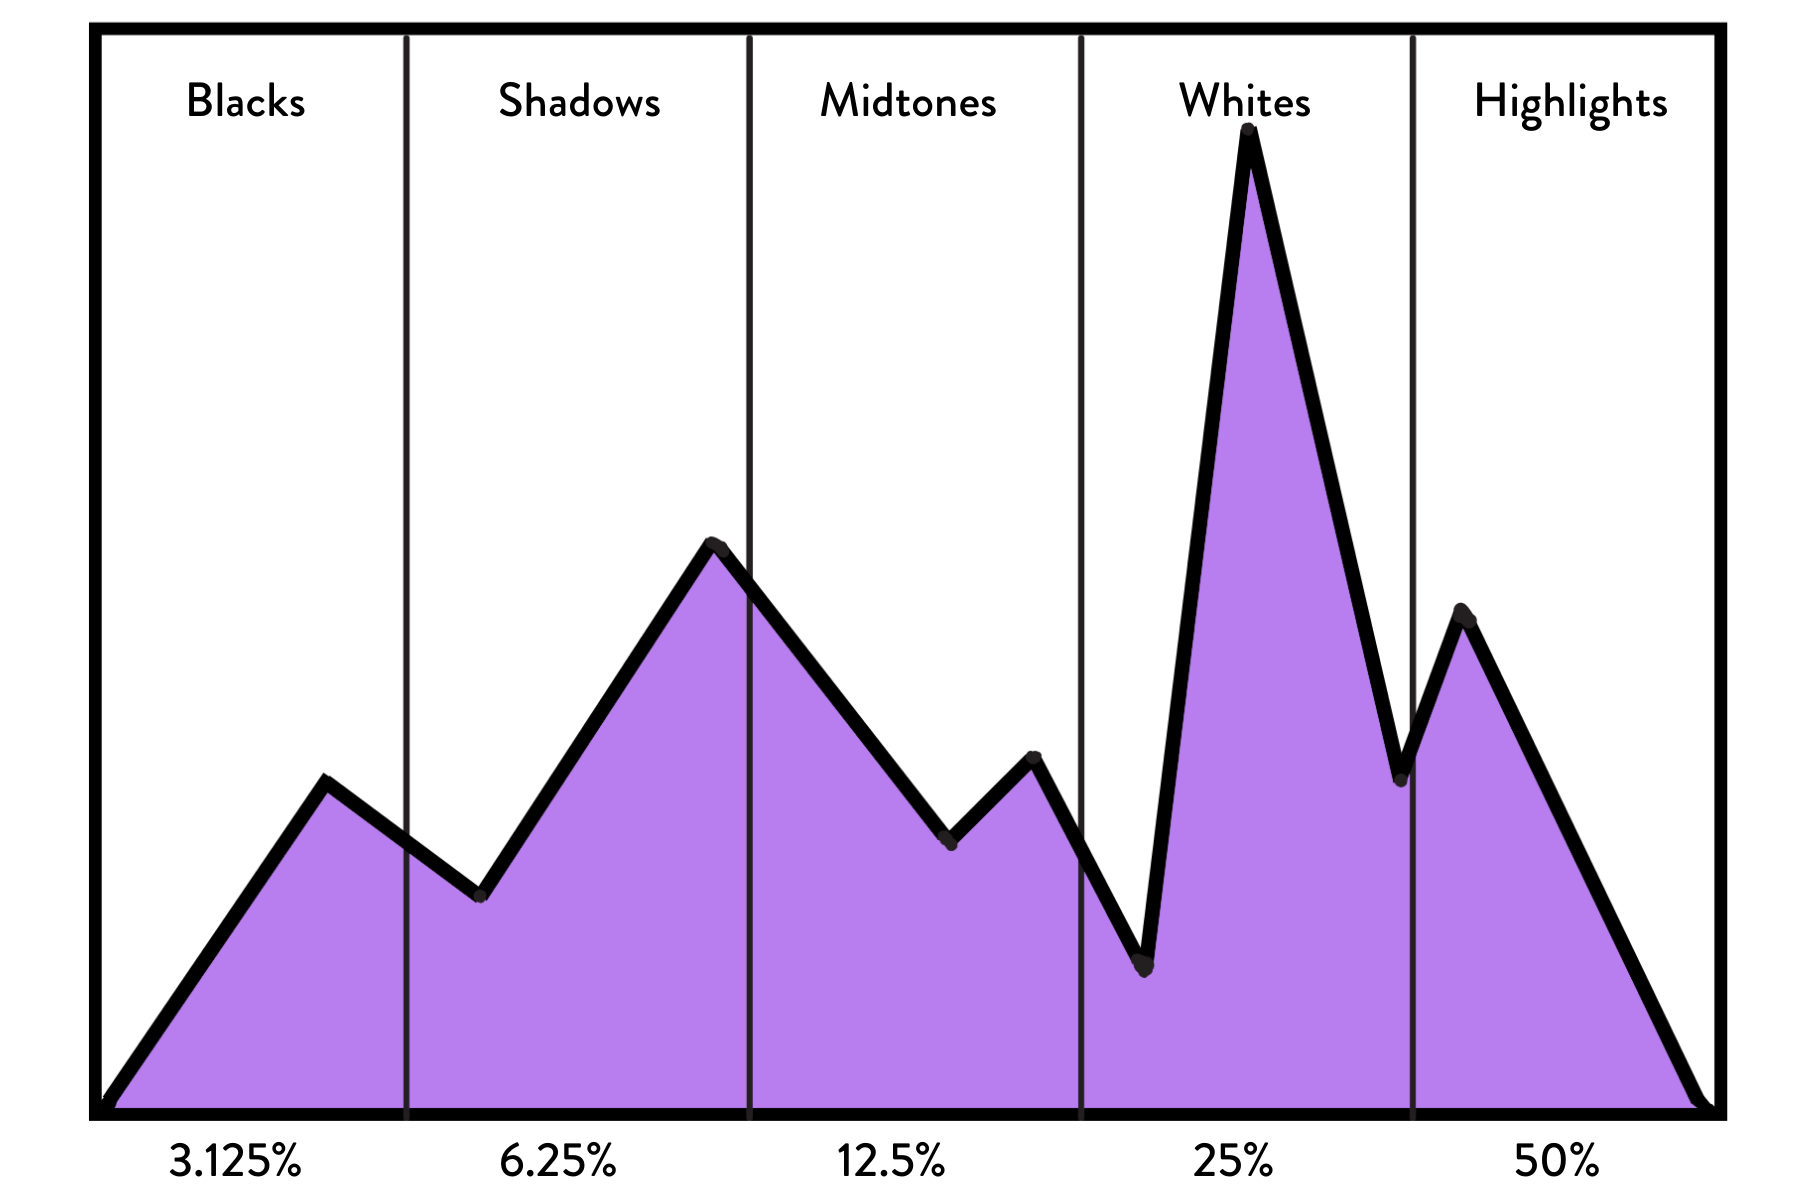
Illustration of a histogram, showing the percentages of information or camera sensors record in each tonal area.
As I mentioned at the top of this post, many photographers underexposed because of a self-imposed limitation on their comfort with “high" ISO. Then they open up the exposure in Lightroom by adjusting the exposure, shadows, and other sliders, creating noise, and say, “See Annalise? I told you that anything ISO 6400 and higher is just all noise.”
Au contraire, mon frère!
Since our histogram reads light and light is information recorded by your camera, you can easily see exactly where your exposure is in real-time (for mirrorless, DSLR photographers will still have to take a photo and then check the back of their cameras).
50% of the information (light) your camera is capable of recording is in the last 20% of the far-right side of the histogram. Thus, if you are underexposing by one full stop, you are leaving as much as 50% of the information you could be recording off the table. When you’re exposing properly, you can reduce the exposure in post-processing without introducing noise because all the information your camera is capable of recording has been recorded.
When you underexpose an image, you leave it up to your post-processing software, like Lightroom or DxO, to “guess” what information you didn’t record and fill in as best as possible. This is where a significant portion of noise from post-processing is created—your software is literally trying to create information where not enough existed.
The histogram displays the distribution of light in the image across 255 different tones, from black (on the left) to white (on the right). The shape of the histogram varies depending on the scene's lighting conditions and the exposure settings used. Contrary to popular belief, there is no "perfect" histogram shape, such as the “bell shape” photographers used to talk about at the start of the digital photography era.
Instead, the goal is to achieve a histogram that is as far to the right as possible without clipping the highlights—this is known as "exposing to the right." By pushing the histogram to the right, you ensure that your camera is recording as much information as possible, which is crucial for low-light photography success.
When you underexpose an image, the histogram shifts to the left, and you lose valuable information, especially in the shadows. This loss of information leads to increased noise when you try to recover the shadows in post-processing. On the other hand, if you expose to the right, you capture more detail in the highlights and midtones, resulting in a cleaner image with less noise.
With a proper exposure, you can always “pull down” the things that appear too light for your own style, and no noise will be introduced to the photograph. But you cannot go the other direction without introducing noise into your image.
Pushing to the Right or Exposing to the Right
As a visual person, I made these photographs to help “show” and not just “tell” other wildlife photographers how this all works. Wildlife is most active at the edges of dawn and dusk, so it’s to your benefit as a wildlife photographer, to get comfortable “pushing to the right” or “exposing to the right” and recording as much information as possible in-camera.
What is “exposing to the right”? That’s when you expose the photo as far to the right as possible in the histogram without letting the information touch or “run up the side” of the histogram itself. You should leave room for a just a hair or two to fit in between where your histogram ends and the side of the box begins.
“So I should overexpose?”
“Absolutely not, you should PROPERLY expose your photo, and/or expose to the right.” Pushing to the right is NOT overexposure. Overexposing occurs when you “blow out” your highlights by letting your histogram touch the side of that box. Once you do that, parts of your image will not be recoverable.
Visual Examples of How Underexposing is the Creator of Noise
I created this series of photos keeping the shutter speed and aperture the same throughout the entire process. The shutter speed was 1/1000 and because I always photograph with my aperture as wide open as possible for my work (that’s part of my personal style) I left the aperture at f/2.8. I am almost always handheld in the field, and could have lowered my shutter speed if I wanted to, but the brown bear sow in this photo was waiting for salmon to run up the river. Keeping a bit higher of a shutter speed than I normally would for a sitting bear meant that it would be a quick reaction time to bump that speed even higher if she started suddenly running through the water.
The only variable that changed is the ISO. I also used a 100% crop of the image to keep it at the same crop level that almost every publisher, contest, or printer uses for image viewing. Only photographers look at their images at 400% - no one else cares.
In the photo below, I’ve started at ISO 6400, which is an ISO that I hear a lot of photographers say is the highest they are comfortable taking their camera. Anyone can see with a Quick Look that I have captured nothing in the last 20% of the histogram, resulting in leaving at least HALF of the light my camera is capable of recording on the cutting room floor.
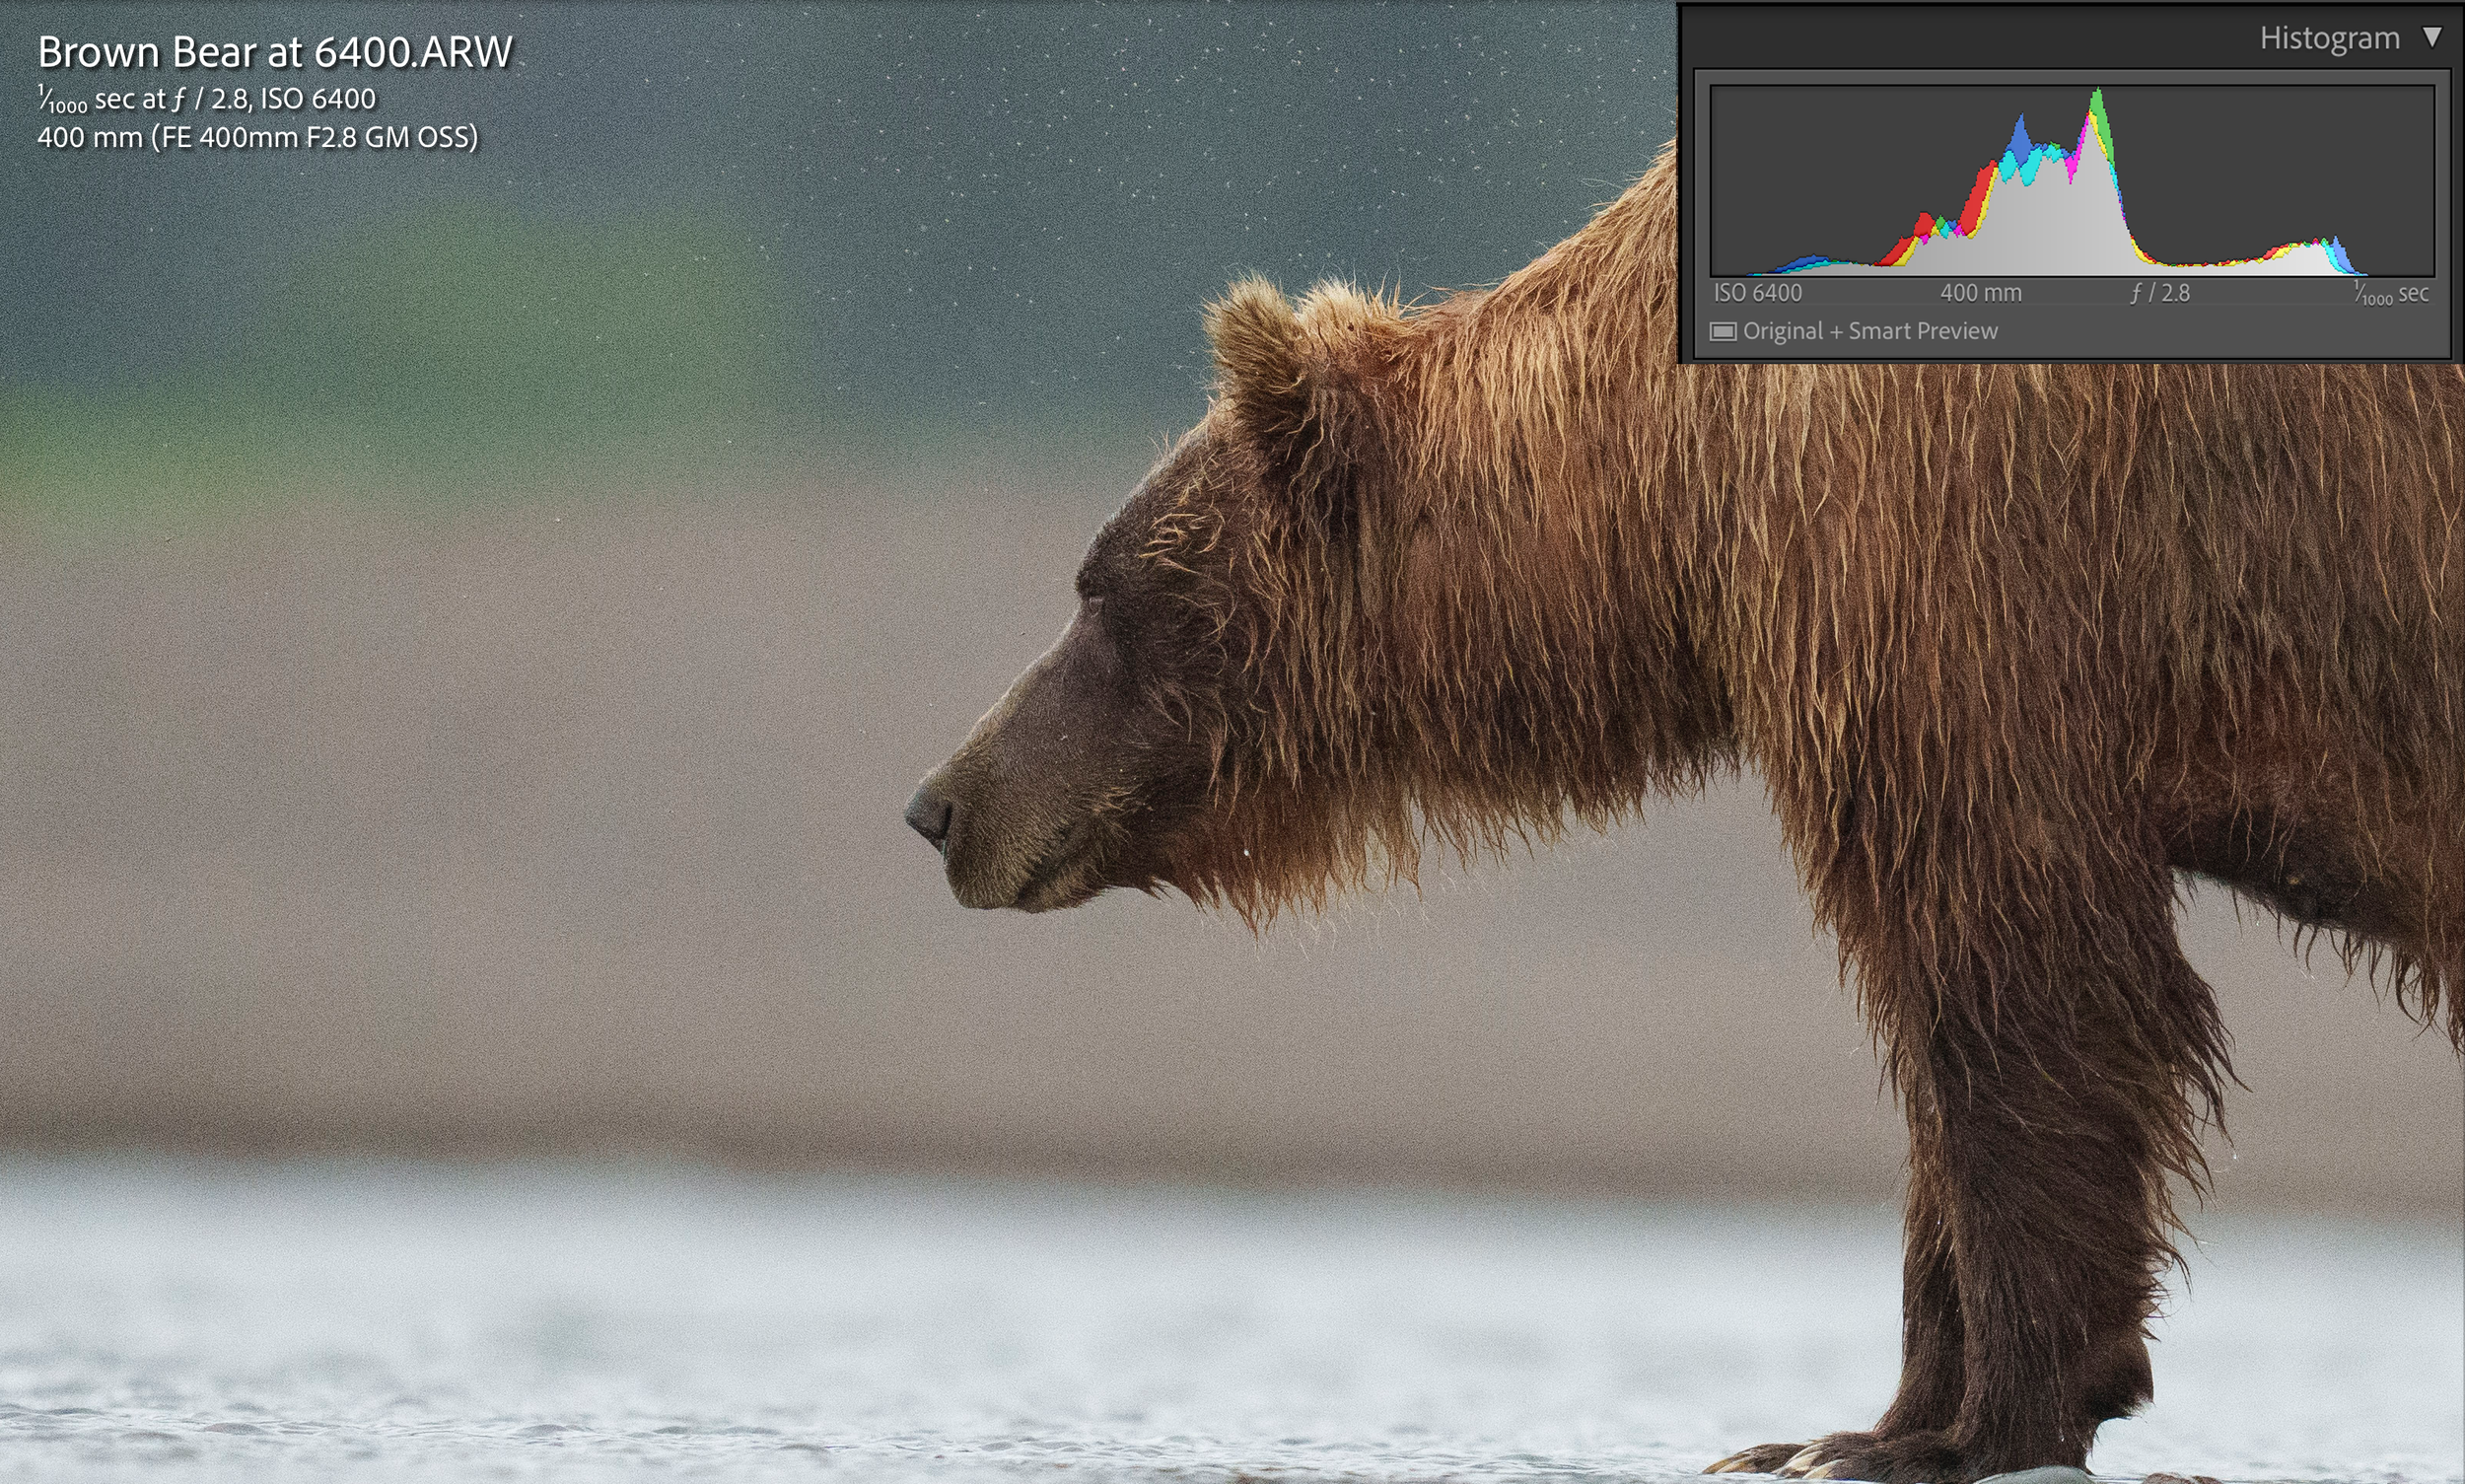
This image is straight out of camera (SOOC) and is more than one full stop under-expsosed. Yet, many photographers see a histogram like this and think it’s perfect acceptable, not realizing they will introduce a lot more noise when they edit it, like in the next photo.
I brought the exposure up to where it needed to be in Lightroom, and you can see, I had to bump the exposure up by +1.7, and the noise left by the lack of information is apparent to the naked eye.
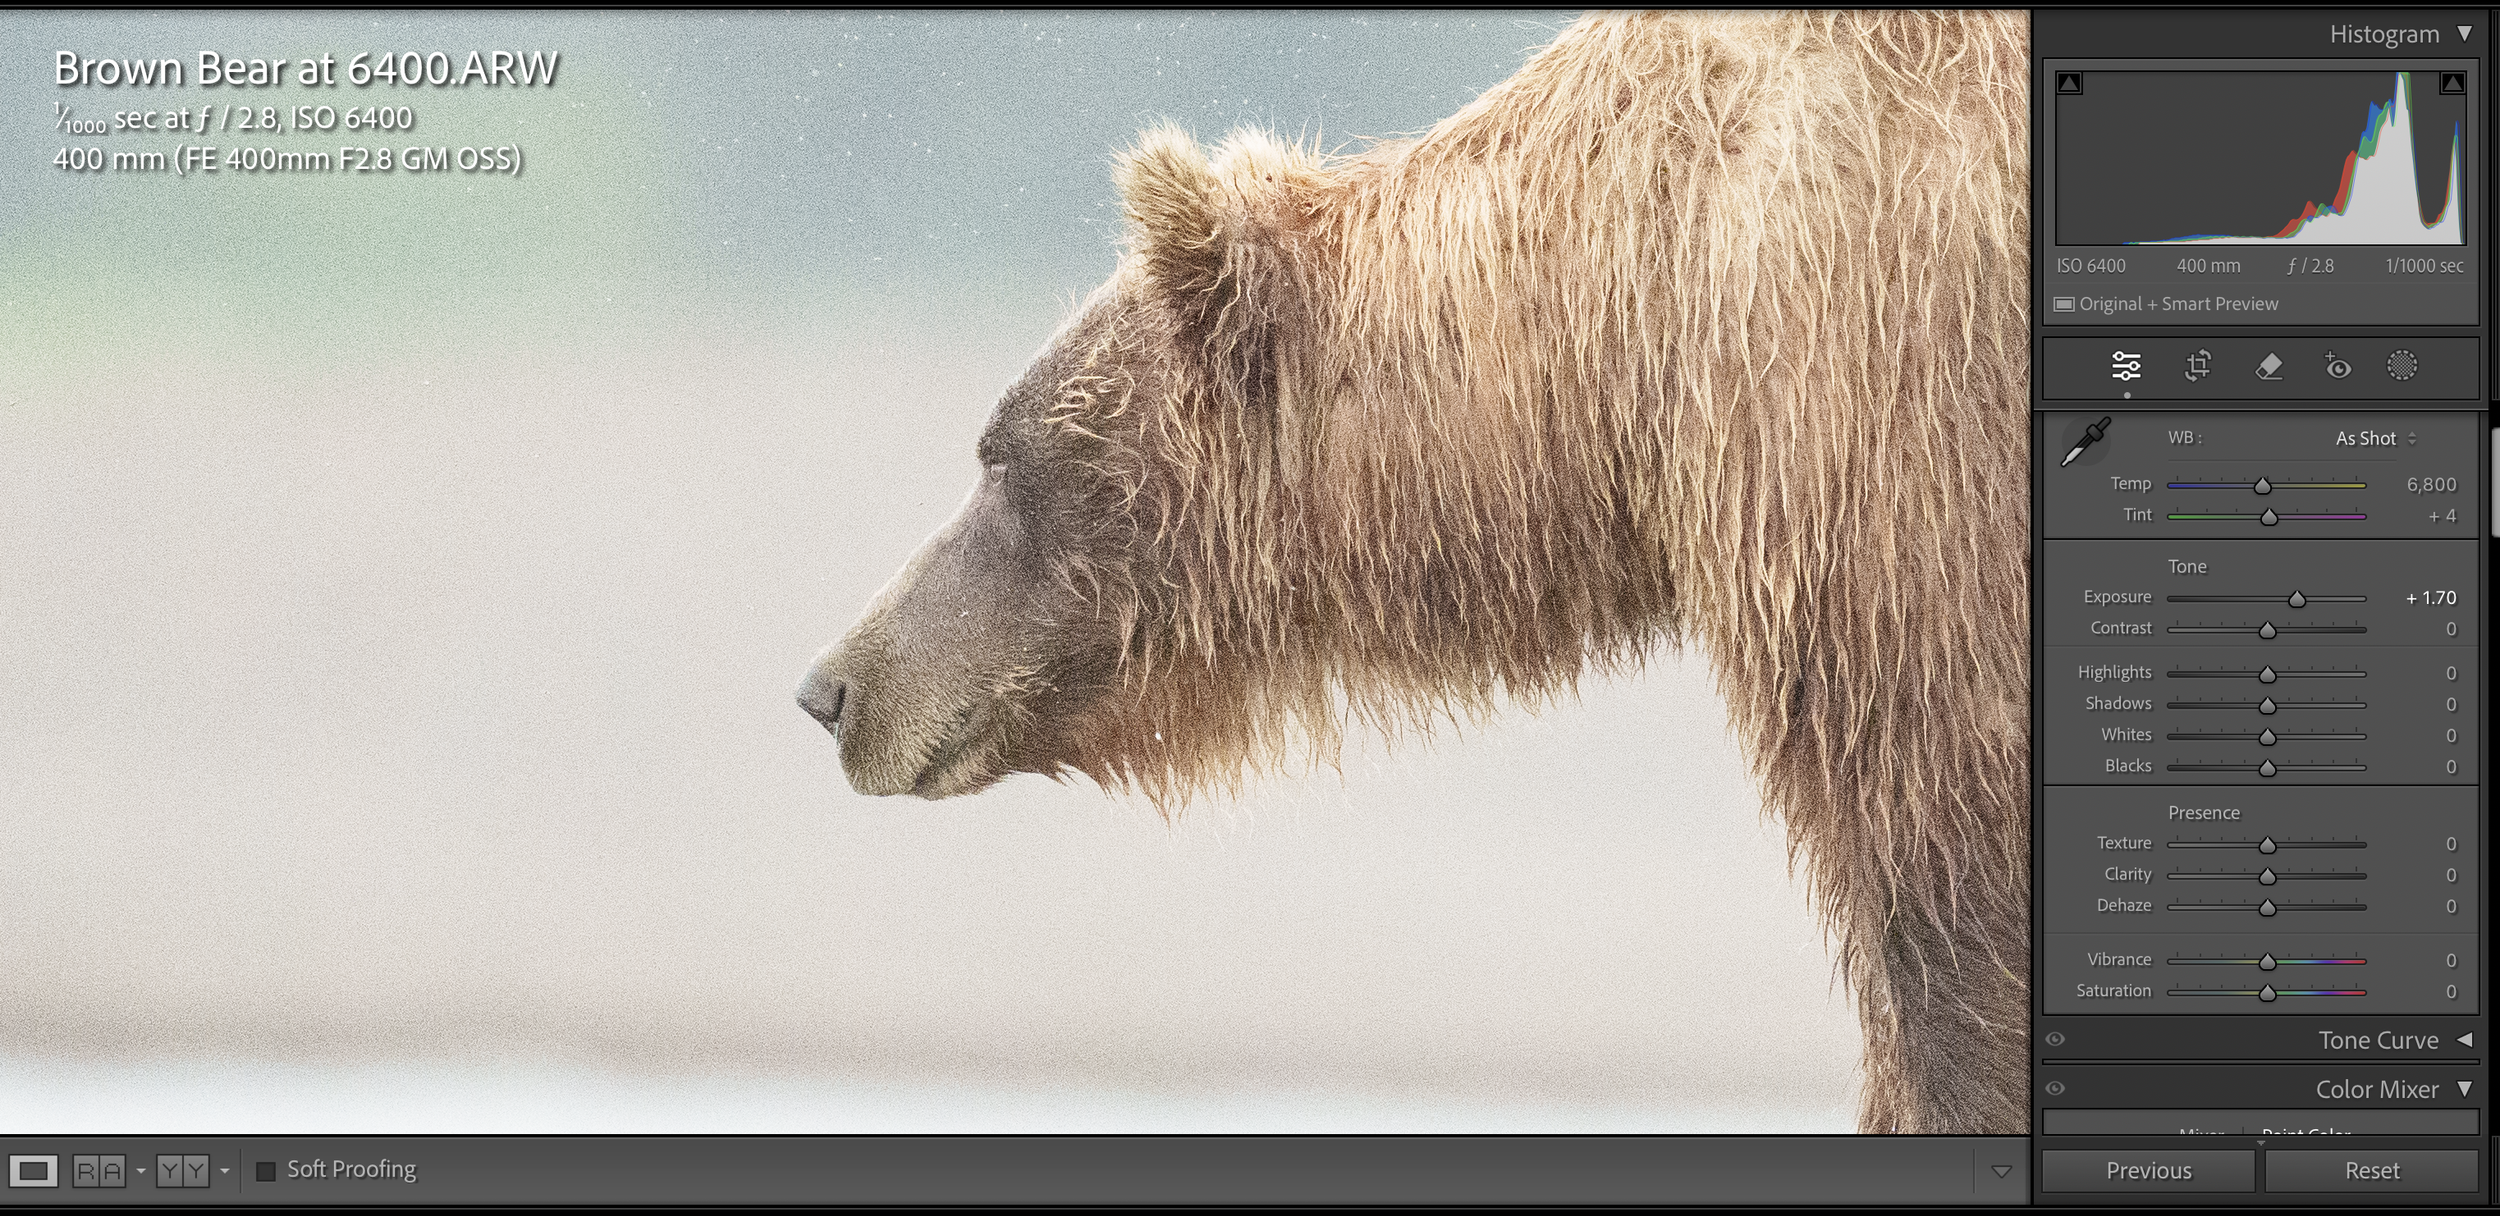
The same photograph as above, but with the exposure slider (which is what handles the midtones of our photos, brought up almost two stops to get it where it should have been in-camera to avoid this noise.
In this next image, I pushing the ISO to 8000, which is another ISO that many wildlife photographers feel is “stretching it” when it comes to the capabilities of their cameras. It’s a vast improvement over what the camera recorded at ISO 6400, but it still falls significantly short of the ISO needed to “expose to the right” and get as much information as possible to create a cleaner, better photo for editing.
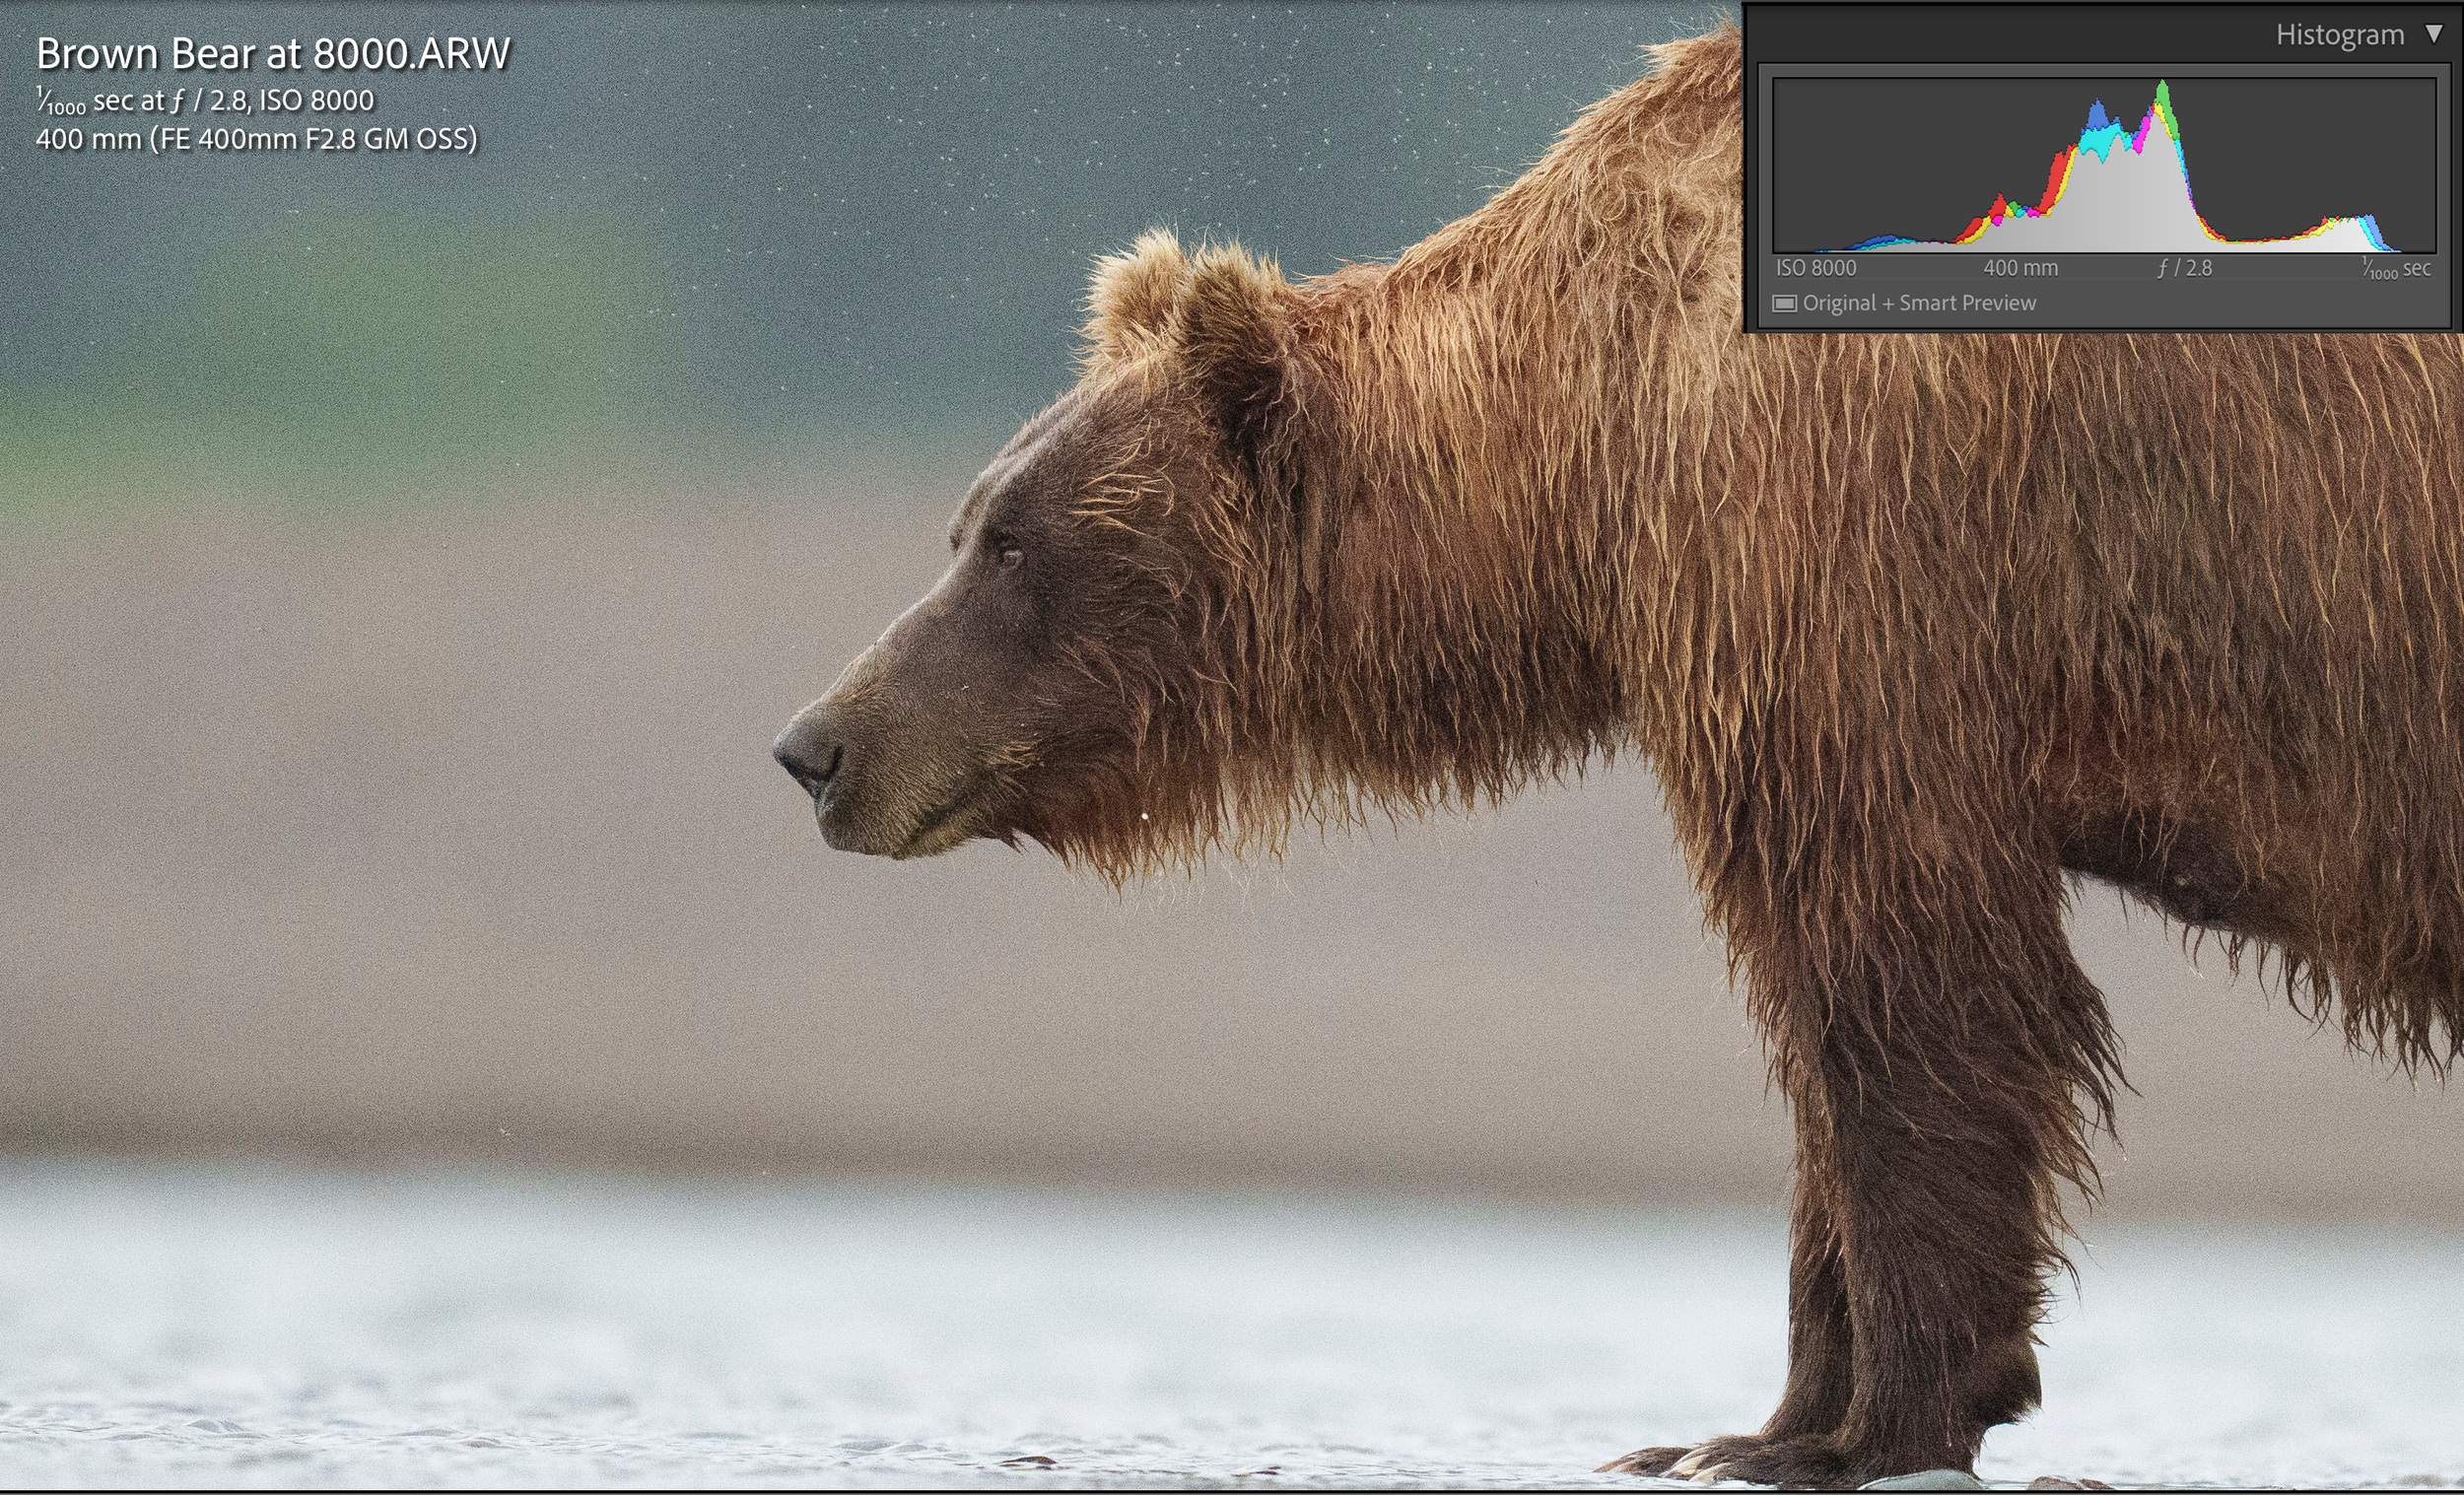
More information made it into the far 20% of the histogram, but it still wasn’t enough to create a proper exposure in these low light conditions.
Instead of going through every single level from ISO 6400 to where it needed to be, let’s fast forward to where this photograph actually needed to be for an exposure that is pushed to the right and maximizes the amount of information that my camera is capable of gathering. Remember, the goal is to gather as much information (a/k/a light) as possible so that I have the best possible photograph to work with.
With ISO, it is always about going as low as possible but as high as necessary.

Looking at my histogram, you can see that by bringing my ISO to 20,000, I’ve brought the information all the way over to the right, but I still have a tiny bit of room between where that information ends and the side of the histogram box.
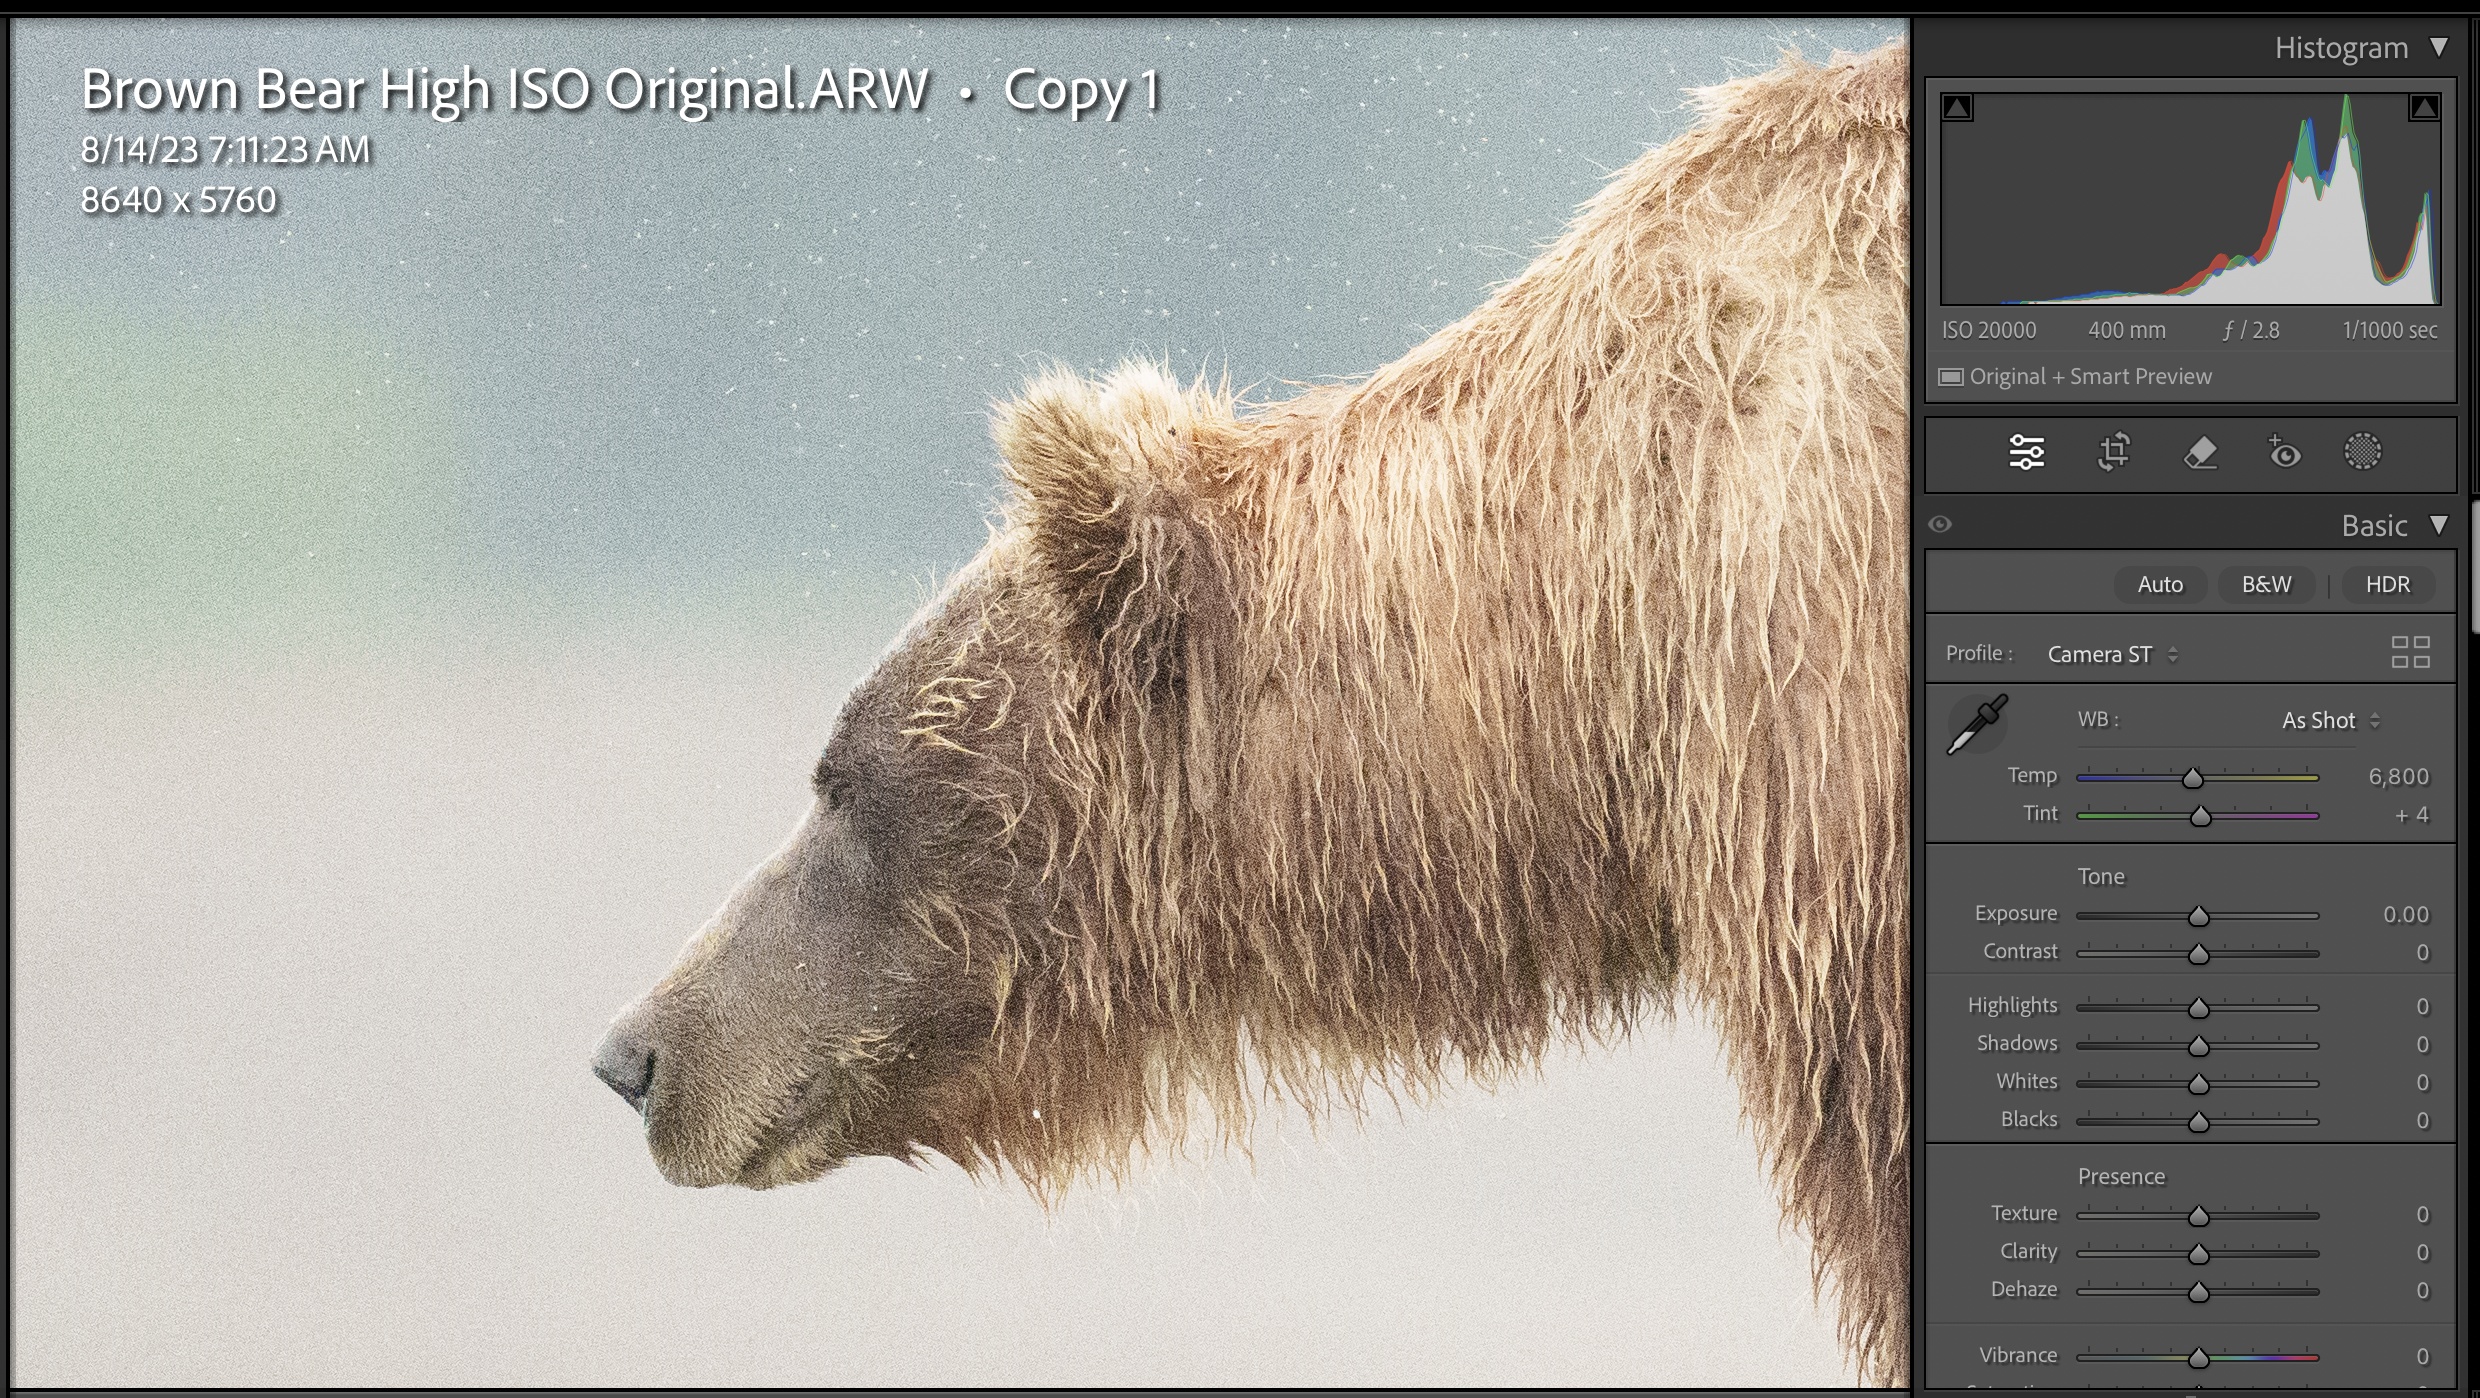
Here’s a 100% crop of the image without any editing or noise reduction or adjustments in post-processing.
Before you say it, yes, I know there is noise in this image. Whenever you photograph at high ISO levels in low light, you will have noise. This is simply part of photography, hard stop. But this amount of noise isn’t the enemy that so many photographers think it is. Again, no one else is going to pixel peep the photograph, nor are they going to view your photograph from mere inches away. That’s not how anyone views photos in real life!
Instead of overthinking it, I used some simple masking and slider adjustments in the noise reduction panel of Lightroom, and added a touch of sharpening. This level of noise, at ISO 20,000, is completely manageable without plugins or AI software, etc.

Here, I’ve masked a little bit and worked with the luminance and color sliders to work with the color noise that was in the original photograph, but the rain drops are still visible.
Below are the two images together for a closer comparison. The top portion of the image is the finished product, with the manual noise reduction, and the bottom image is the photo straight out of camera without any adjustments. Even the original photo without adjustments was sharp and contained plenty of detail. I could have easily sold this image without the noise reduction at all.
The top image is the final image, with the luminance and color sliders adjusted to mitigate some of the noise. The bottom image is SOOC, with nothing changed or adjusted.
Considerations With Noise Reduction and Pushing to the Right - Commonly Asked Questions
Most people struggle when they first learn to push their histogram to the right and get a better image, and I wanted to round out this post with some answers to questions I get most often.
But what about my viewfinder? When I push to the right everything looks so washed out!
Of course it does. Your electronic viewfinder allows you to control the level of brightness in it, as does the screen on the back of your camera. These customizations often result in something looking far brighter and more “washed out” than what our histogram says. But your histogram is your northern star here - follow it, and as long as you aren’t clipping your highlights, you will be more than fine when you bring that image into Lightroom for post-processing.
I am pushing to the right, but when I look on the back of my camera I am still seeing blinkies, so I’ve overexposed my photo!
The image on the back of our cameras is a .jpg rendition of a RAW photograph. Jpgs do not represent the full dynamic range of a raw photo. You may see a sprinkling of “blinkies” in your images, but as long as you didn’t clip your highlights, your photograph will retain the detail in those highlights and whites when you bring it into post. A few little blinkies here and there is entirely normal when you’re pushing to the right and photographing in raw. Your human judgment comes into play here, but again, in the histogram I trust!
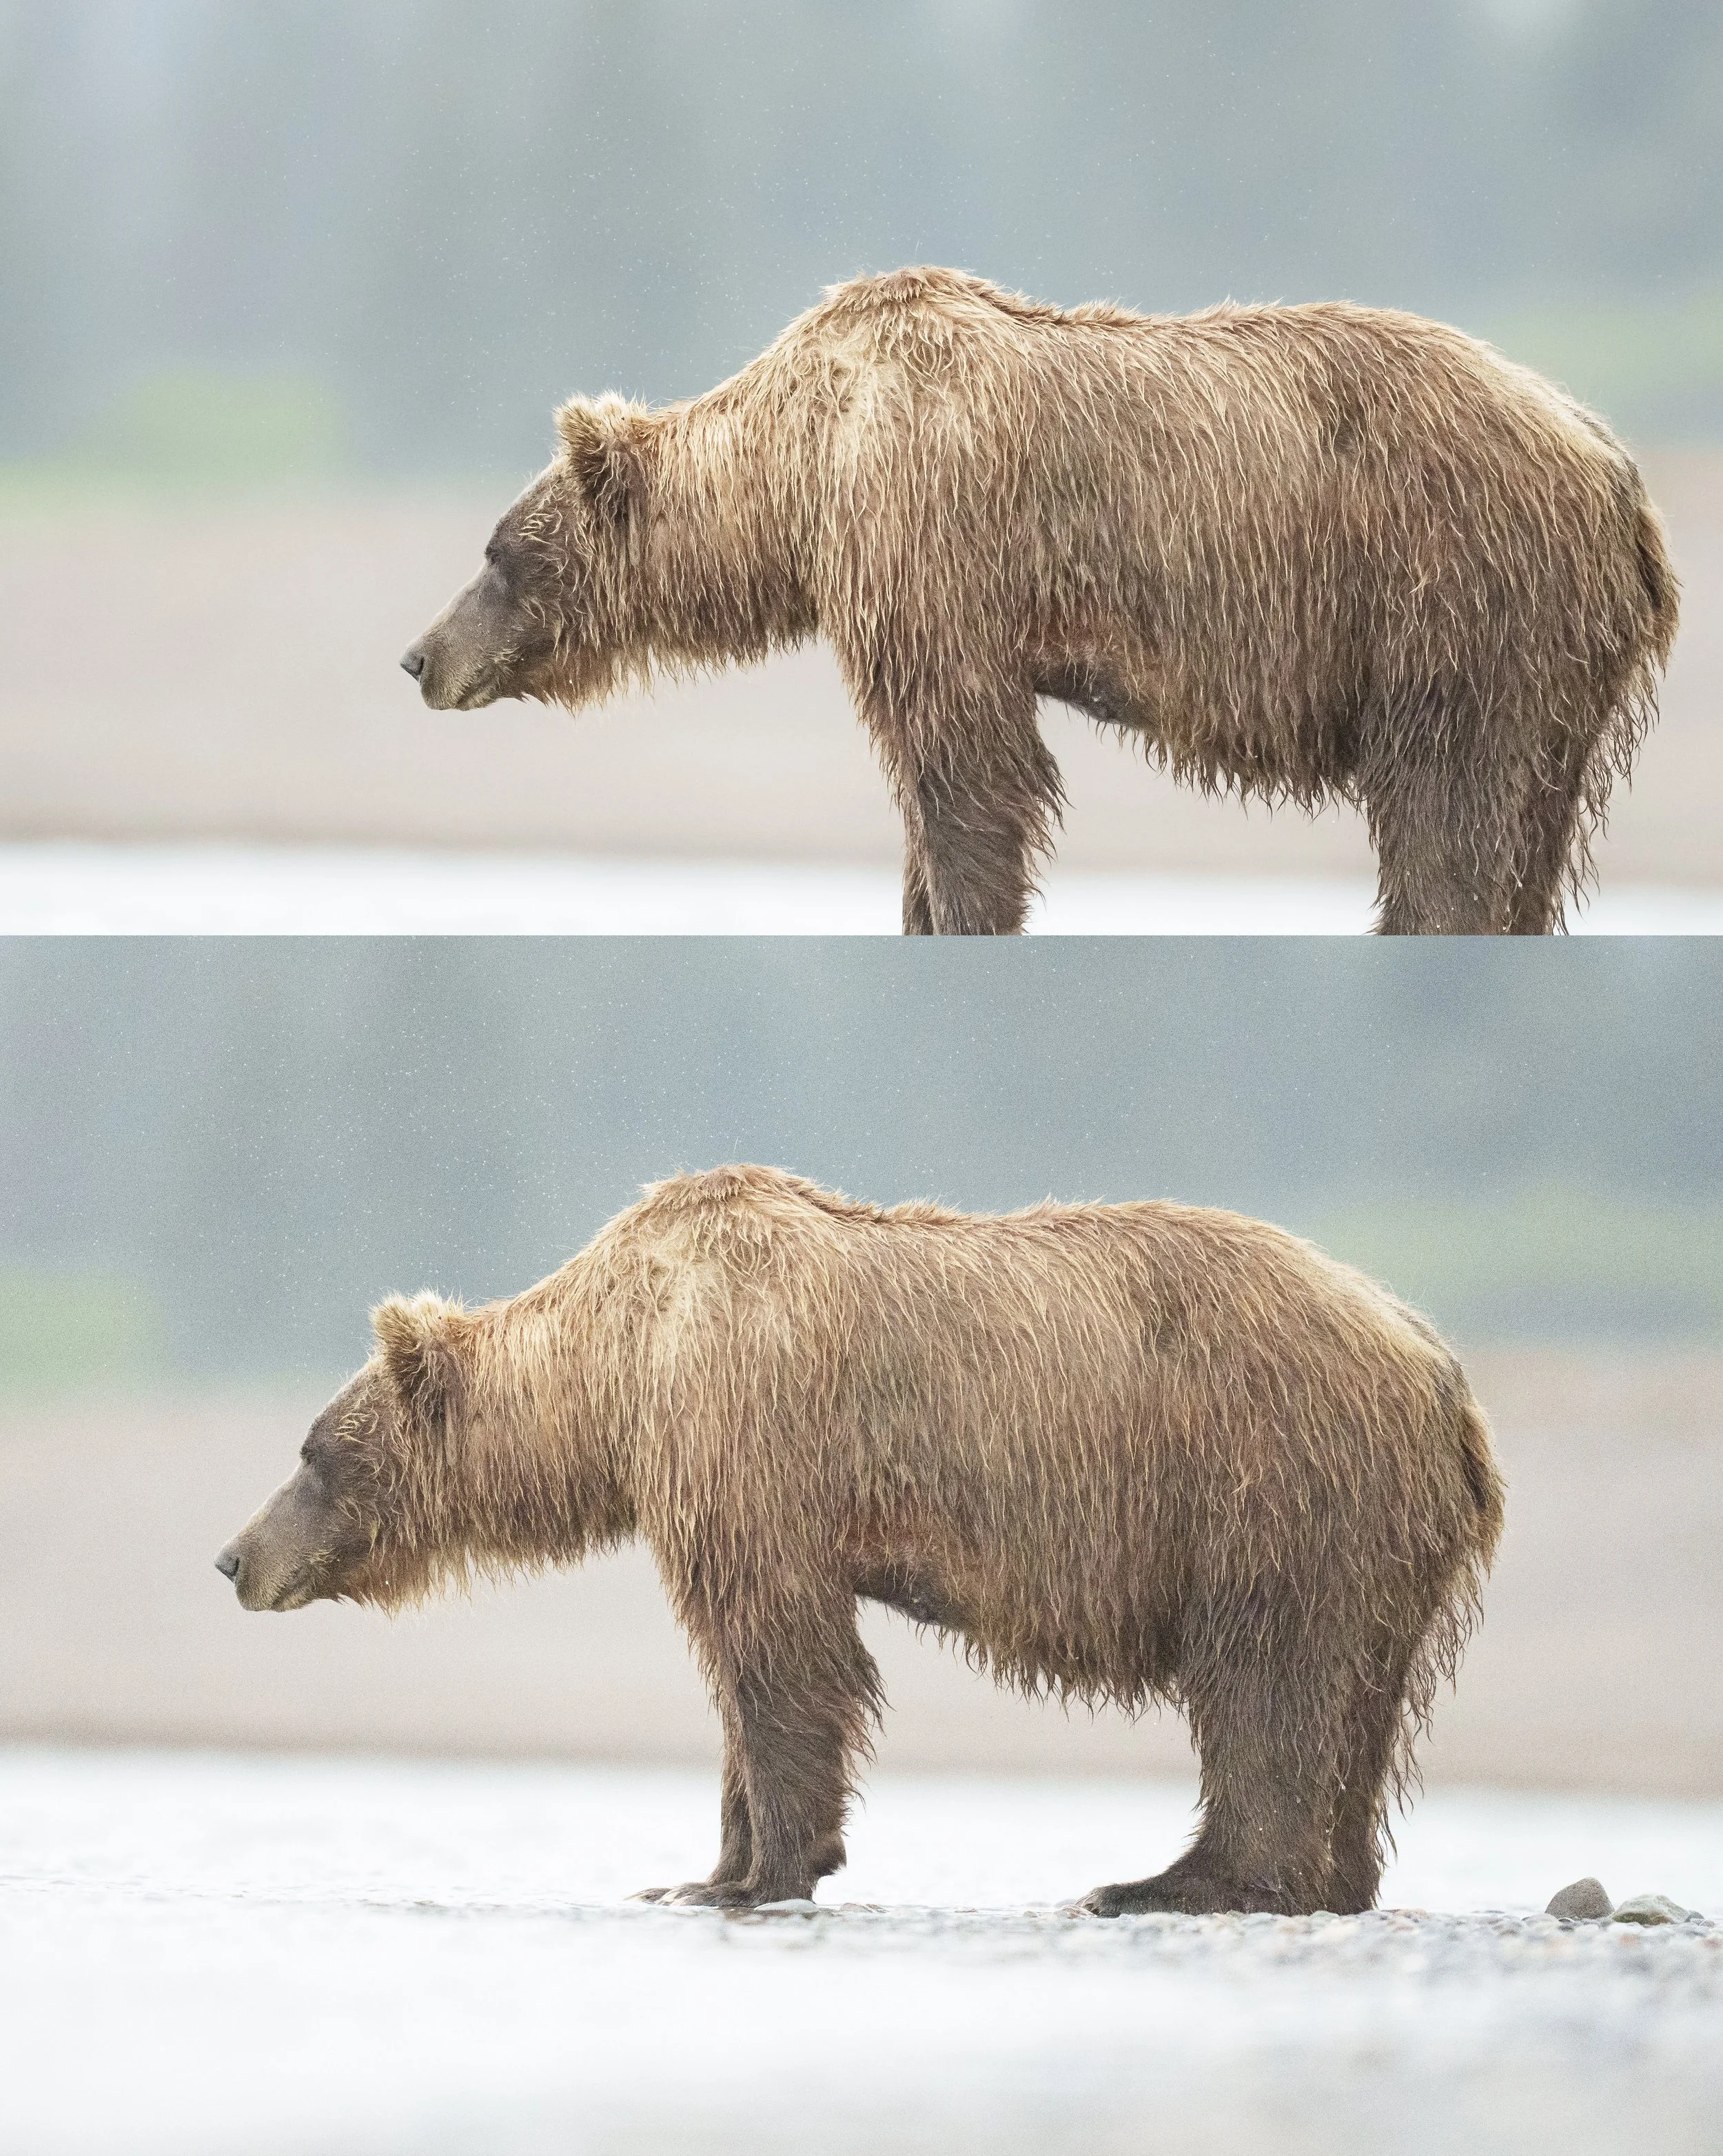
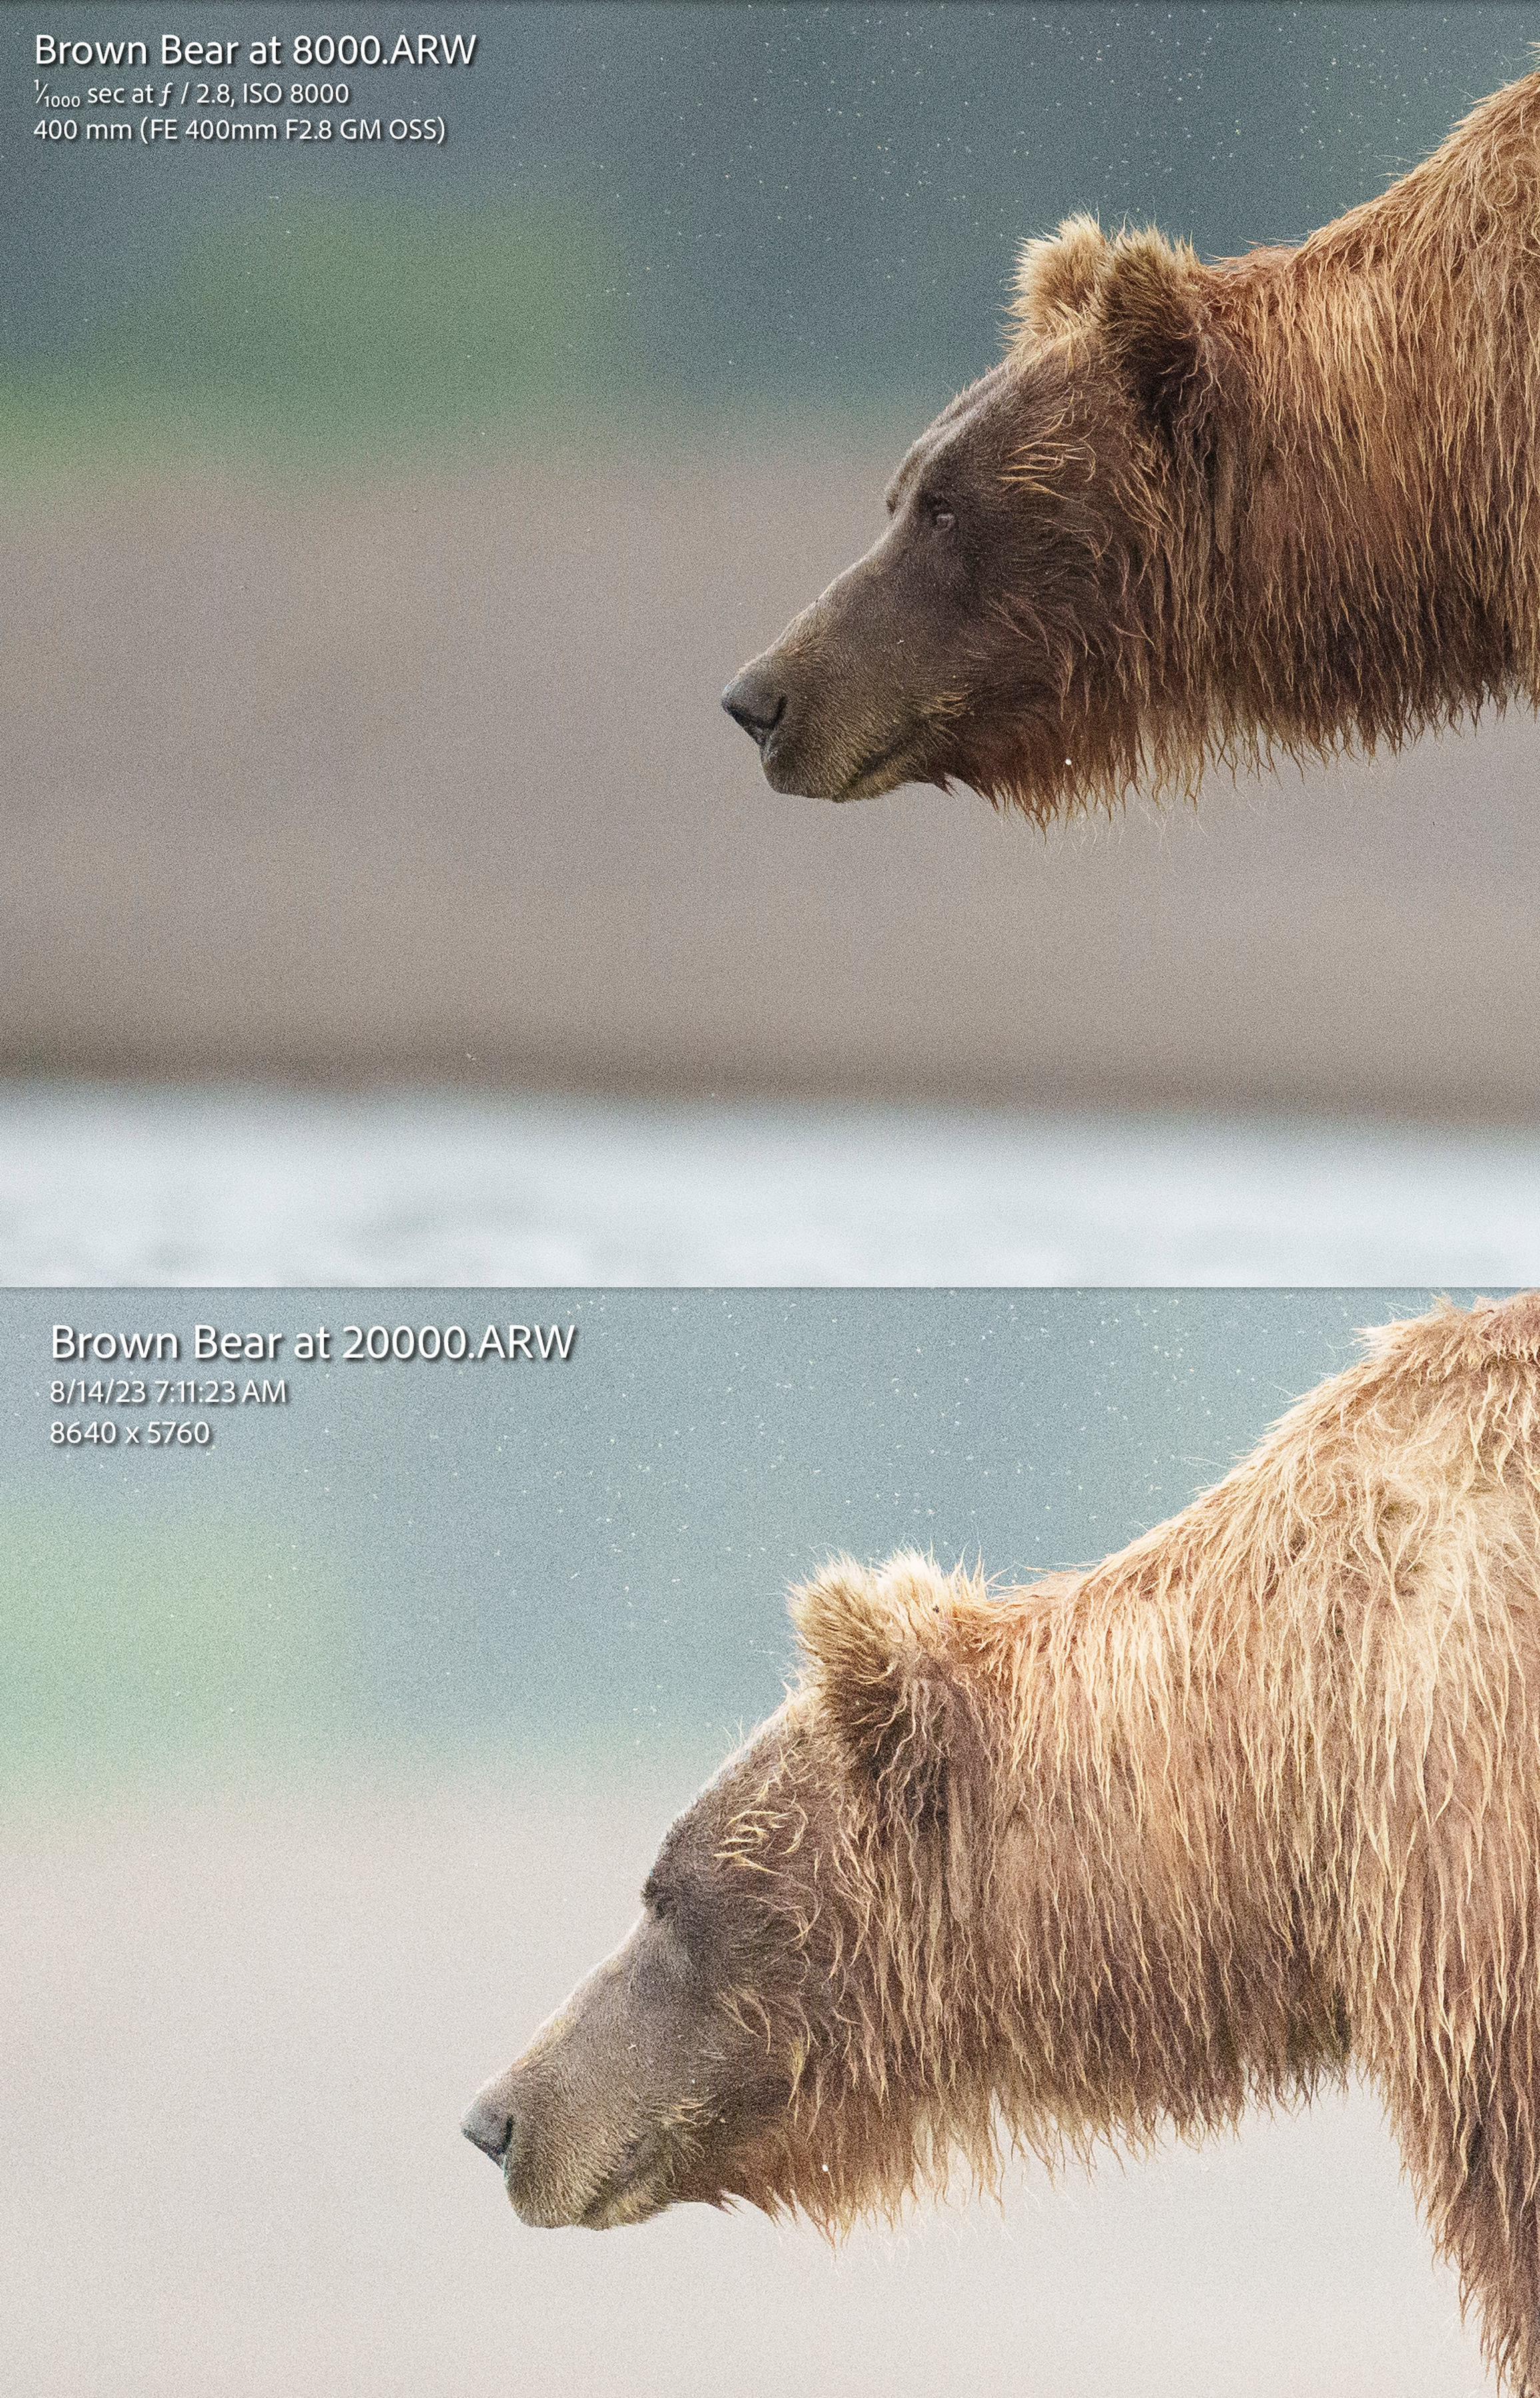
As a final comparison in this low light photography example, I wanted to share a visual that drives home the point I made near the top of this article - that prioritizing an arbitrary rule of a low ISO over pushing to the right because you’re afraid the ISO is too high will often introduce far more noise than properly exposing to begin with. Below is a comparison of the ISO 8000 image SOOC next to the ISO 20000 image SOOC. You can easily see how much more color noise (the noise that loves to live in the shadows) stands out in the ISO 8000 image, and it only will get worse as you try to fix it during post-processing.
Save yourself a lot of noise by pushing your histogram to the right, even if it means increasing the ISO. It’s the underexposure, then trying to “fix” it in post that introduces more noise to your photograph than if it had been properly exposed with a higher ISO to begin with.
Remember, every bit of light that you capture is information, and every piece of information contributes to the quality of your final photograph. Embrace the challenges of low-light wildlife photography, push your personal ISO boundaries, and watch as your wildlife photography reaches new levels of excellence.