You Can’t Save What You Didn’t Shoot

A pronghorn (Antilocapra americana) photographed at ISO 16,000 without any AI noise reduction or editing.
Cutting my teeth as a photojournalist came in the form of accepting virtually every assignment a photo editor threw my way. Cops and courts? You got it. Ribbon cutting ceremony? I am ON IT. Concerts? Absolutely. Once I started photographing music, it seemed like that’s what I was always being assigned, which was perfectly fine with me.
First it was indie up-and-comers in smoky dive bars, the kind of places that didn’t have a real lighting system and required at least two showers to remove the stench of the night’s work. Eventually it became festivals and bigger acts, like Elton John, Earth, Wind, and Fire, and The Avett Brothers. And while every assignment was an adrenaline rush, the lighting crew of those big gigs seemed determined to make my job, in which I only had three songs to shoot my entire assignment before being kicked out of the photo pit, as difficult as possible.
The stage lights cut to black. In the split second of darkness, I'm already moving — ISO from 400 to 6400, then back down to 200 as a spotlight hits center stage, then rocketing up to 8000 as the band moves into the shadows.
One moment I'd be capturing a guitarist bathed in warm amber light, the next I'd be shooting the drummer barely visible in moody blue shadows. Then red lights, which are always converted to black and white. Non-stop flashes of light everywhere. The ISO dial became an extension of my creative vision, not just a technical necessity.
You wouldn’t think it, but those manic, sweat-soaked nights in cramped photo pits taught me so many lessons that would later revolutionize my approach to wildlife photography. Those days taught me some pretty sick air guitar moves, too, but you'll have to catch me in the right mood and buy me a cold one if you want me to break those out.
Here's where my path diverges from many of today's photographers. While AI-powered noise reduction has become the standard solution for high ISO images, I don’t use it, at least not for 99% of my work. As a photojournalist who sells my work to publications and agencies, I’m bound by ethical guidelines that require my images to represent reality as faithfully as possible. Every AI intervention, no matter how subtle, is a step away from the pure documentation that my profession demands.
This means I can't rely on post-processing miracles to save an underexposed or poorly executed shot. Everything has to be as close to perfect in-camera as possible. It's a constraint that has pushed me to master my equipment, and be comfortable operating at ISOs that would have been unthinkable just a decade ago.
The biggest agency of them all, Getty Images, has strict anti-AI policies, disallowing any sort of generative AI in stock photography, including photos that have been sharpened or denoised with software like Topaz or the denoise features in Lightroom.
Most photographers realize these programs are AI-based tools, but many don’t realize how they work, and that they are, in fact, “generative” AI programs. The software is not simply enhancing what is already there, but recreating the visual information in a more detailed and natural looking way. This is the foundation of generative AI in imaging: generating new data based on learned patterns rather than manipulating the pixels that are already there to appear sharper and more detail-rich. The pixels of the photo are literally replaced.
Generative AI is a big no-no in the rules of every major/serious/legit wildlife photography contest out there (Audubon, Wildlife Photographer of the Year, etc.), and using so much as Topaz sharpening or noise removal will instantly render your entry ineligible. Even if it initially sneaked past the judges, the raw file required by such contests for authenticity and verification of the editing wouldn’t stand up to the scrutiny in the end.
I’m not one who enters contests usually, but I do publish my work and I couldn’t do that if I used those programs either. So if you’re someone who has designs on publishing your work or going for a top award? All the more reason to become ultra comfy with working with higher ISOs and perfecting that low light photography technique.
A couple of months ago, I was photographing sharp-tailed grouse in Wisconsin for a conservation non-profit. That means arriving in the dark, a good hour before sunrise, with only a red-hued headlamp to guide my way to the blind. The grouse fly into their lek at first light, when there is barely enough illumination to even see they have arrived. By the time the sun finds its way up and over the treetops, the impressive grouse display is nearly finished for the morning.
The morning of my outing, with mostly cloudy skies and the sun jostling for a breakthrough position, I pushed my ISO to 64,000. For a few of those frames, I had no choice.
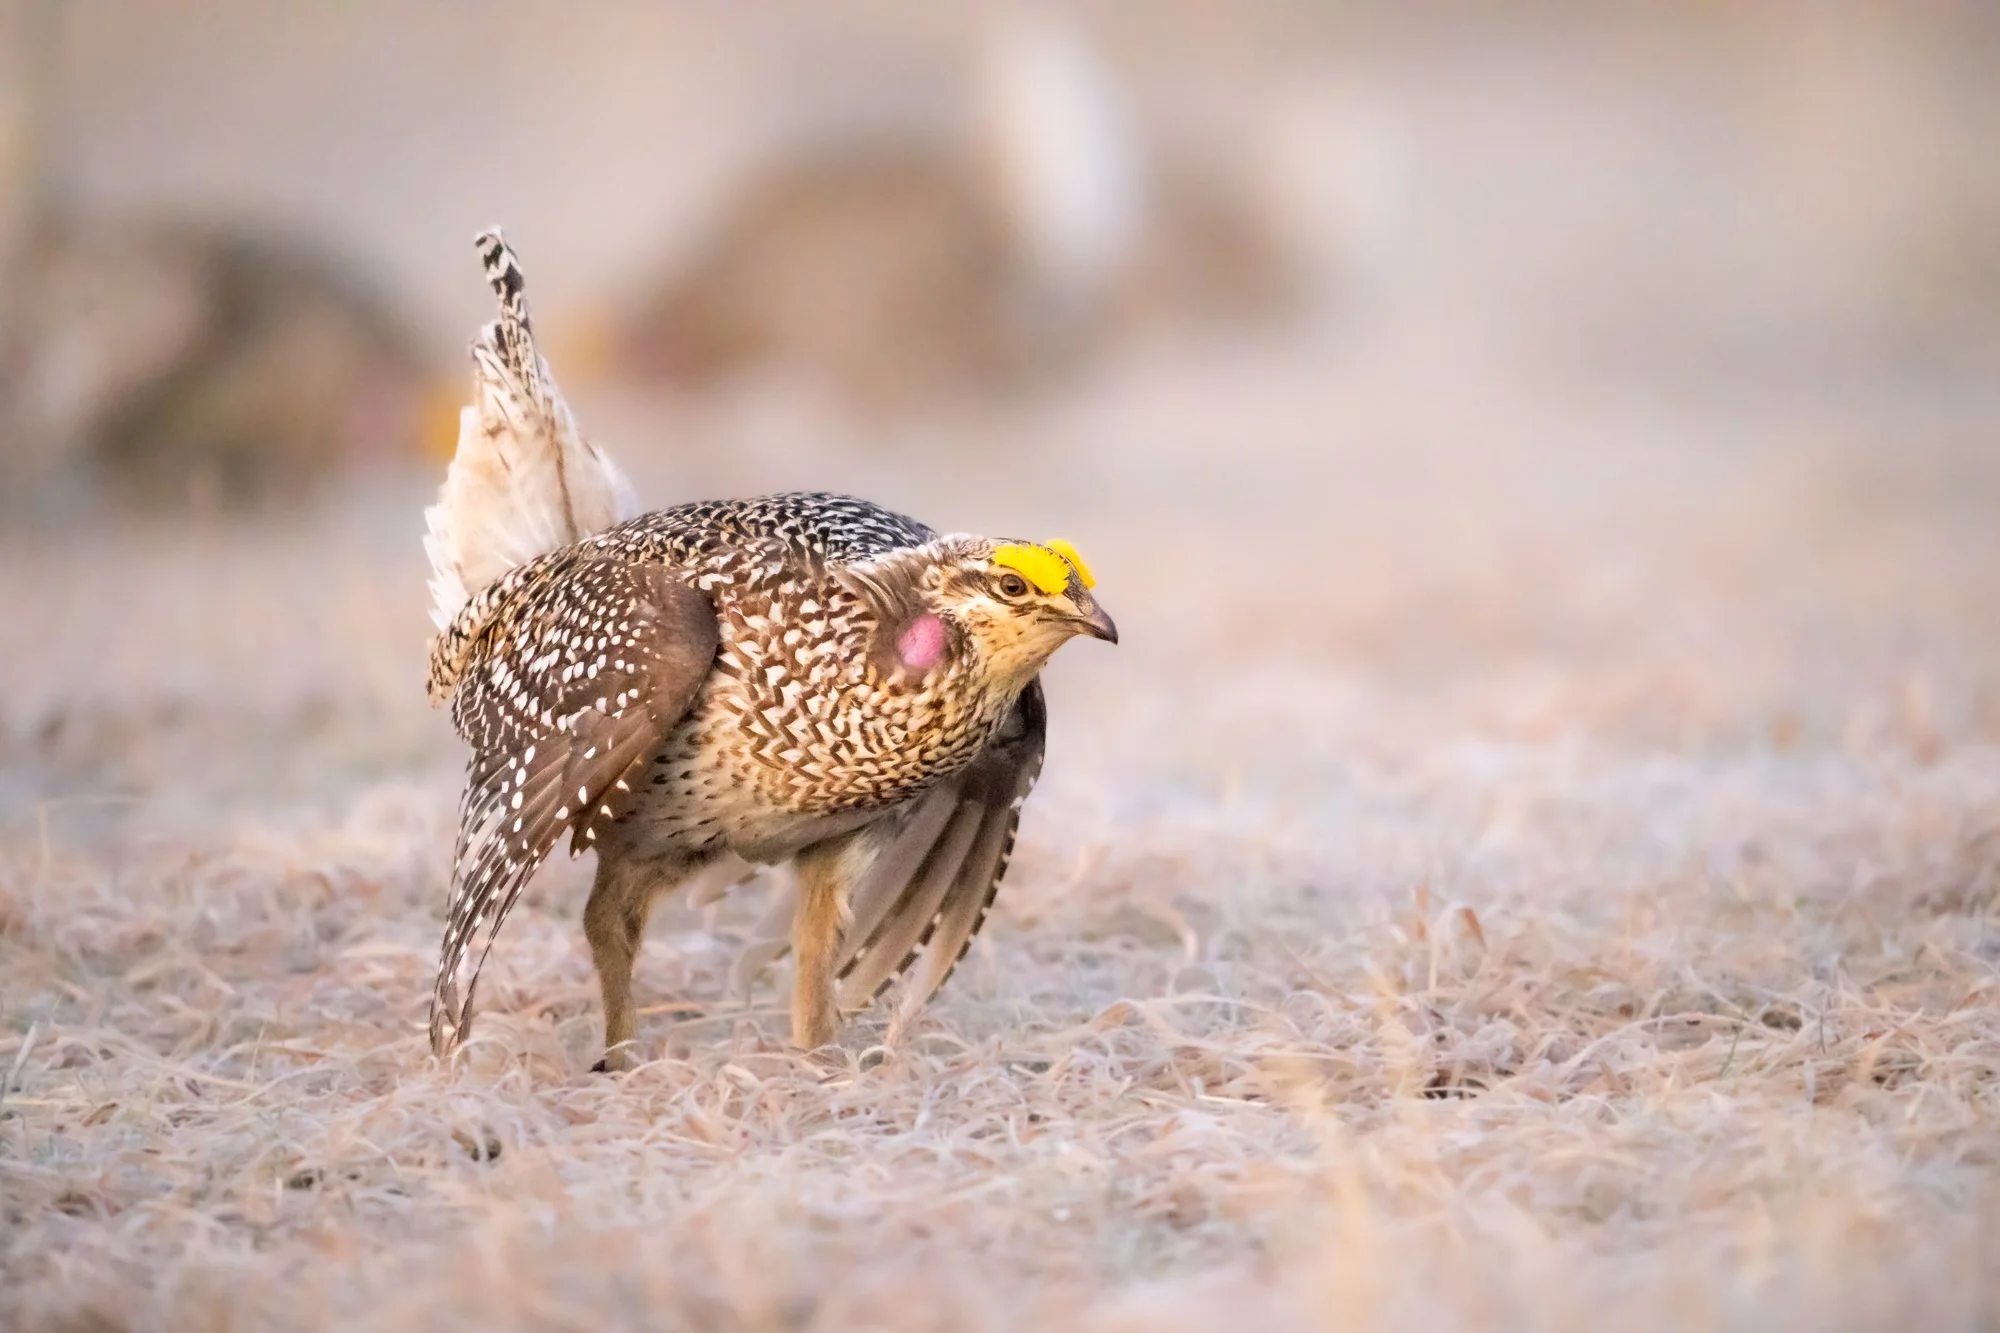
Sharp-tailed grouse at ISO 64,000 without any AI-based noise adjustments.
Sixty-four thousand. Let that number sink in for a moment. When I started in photography, ISO 1600 was considered the realm of desperate measures and grainy last resorts. Now I'm regularly shooting at ISOs that would have been pure fantasy back then, and coming home with images that are not just usable, but sellable to major publications.
Is there noise? Yes, absolutely. Most of it is manageable with the original noise reduction sliders in Lightroom for me, though. Do I want to go that high? Heck no, I try to never go above ISO 25,600 if I can help it.
My mantra is ISO should be as low as possible but as high as necessary.
Like I started out saying in this email, though, I don’t hold the same disdain for noise that so many other photographers do, though.
My point here is to say that when it comes down to it, when you’re in the middle of something as magical as a moment with wildlife, people are going to see what you see: a moment of wild beauty captured in challenging conditions, and the slight bit of noise will not for a minute detract from the story the image tells.
But for those of you who aren’t bound by certain rules with your photography, or who don’t care about contests or publishing, the world of AI-based post-processing software is your oyster. To take full advantage of their capabilities, however, you still have to understand how modern sensors actually work and abandon some old habits that no longer serve us in the digital age.
Those of us who learned on film developed certain instincts that can actually work against us with digital sensors. We learned to underexpose slide film to saturate colors and to push film for creative effect. These techniques were responses to the physical limitations of chemical emulsions, but digital sensors operate by entirely different rules. With film, you could often recover underexposed areas by pushing the development process.
With digital, what isn't captured by the sensor simply isn't there. No amount of post-processing wizardry can materialize information that was never recorded in the first place. This fundamental difference requires a complete rewiring of how we approach exposure, especially in challenging light.
To me, one of the most wonderful features of mirrorless cameras is the live histogram in my electronic viewfinder. No longer do I need to fire a test shot, chimp at the LCD on the back of the camera, adjust settings, and try again — a process that in wildlife photography can mean missing the decisive moment entirely.
With the histogram right there in my viewfinder, I see my exposure in real-time. I can watch the exposure adjust as an animal moves from shadow to light, and anticipate when I need to bump my ISO before the shot happens, not after. It's like having x-ray vision into my camera's brain.
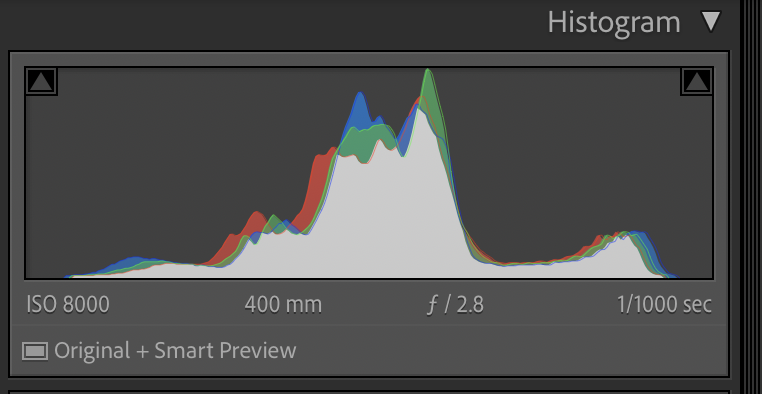
Stopping short of the right side of this histogram by even this little bit (underexposing) is throwing away 30-40% of the light your sensor is capable of recording.
But here's the crucial part that many photographers don't realize: roughly 50% of the light your camera is capable of recording lives in the brightest 20% of the histogram. Think about that for a moment. Half of your image information — all the subtle details, the smooth tonal transitions, the clean color gradations — exists in that narrow band at the right side of the histogram.
When you underexpose, even by what seems like a conservative amount, you're not just making the image darker. You're literally throwing away up to half of the information your sensor could have captured. Those underexposed shadows that you plan to "lift" in post-processing? They contain a fraction of the data they could have held if you'd simply been brave enough to push your ISO higher in the first place.
This is why underexposed images often look muddy when you try to brighten them. It's why the shadows fill with ugly color noise and banding. It's not that your camera isn't capable of clean high-ISO performance. It's that you're asking your editing software to manufacture detail from nothing, to pull data from the darkest, noisiest part of the sensor's range where information is most sparse.
The solution is counterintuitive but liberating: embrace higher ISOs. Push that number higher than feels comfortable, or “expose to the right” (ETTR). Trust your camera's engineering. Modern sensors, especially in professional cameras, are remarkable pieces of technology. They're designed to capture clean, usable images at ISOs that would have been science fiction when we were shooting film.
If you do use AI-driven image enhancing software like Topaz, or Adobe’s Denoise, or DXO, or similar, being comfortable with pushing your ISO means your giving that software the best possible file to work with, as well. The more information you’ve left out of your underexposed image, the more AI-generation takes place and the less your photo is… well, a photo. It’s manufactured based on what AI thinks should be there. But if you give the AI generator the information it needs, then using AI software becomes more about polishing an image than it is about “rescuing” an image.
This approach has practical benefits beyond image quality, too. When you're properly exposing at higher ISOs instead of underexposing at lower ones, you're also gaining shutter speed. That extra speed might mean the difference between a sharp image and motion blur, between capturing the peak moment of action and missing it entirely. In wildlife photography, where your subjects rarely give you second chances, this trade-off is almost always worth making.
So much of photography is not about having the most expensive gear or the longest lens. It's about understanding your equipment so intimately that you can push it to its limits with confidence. It's about making technical decisions that serve your creative vision rather than fighting against it. Most of all, it's about being ready and feeling ready when those magical moments present themselves.
WANT TO GO DEEPER?
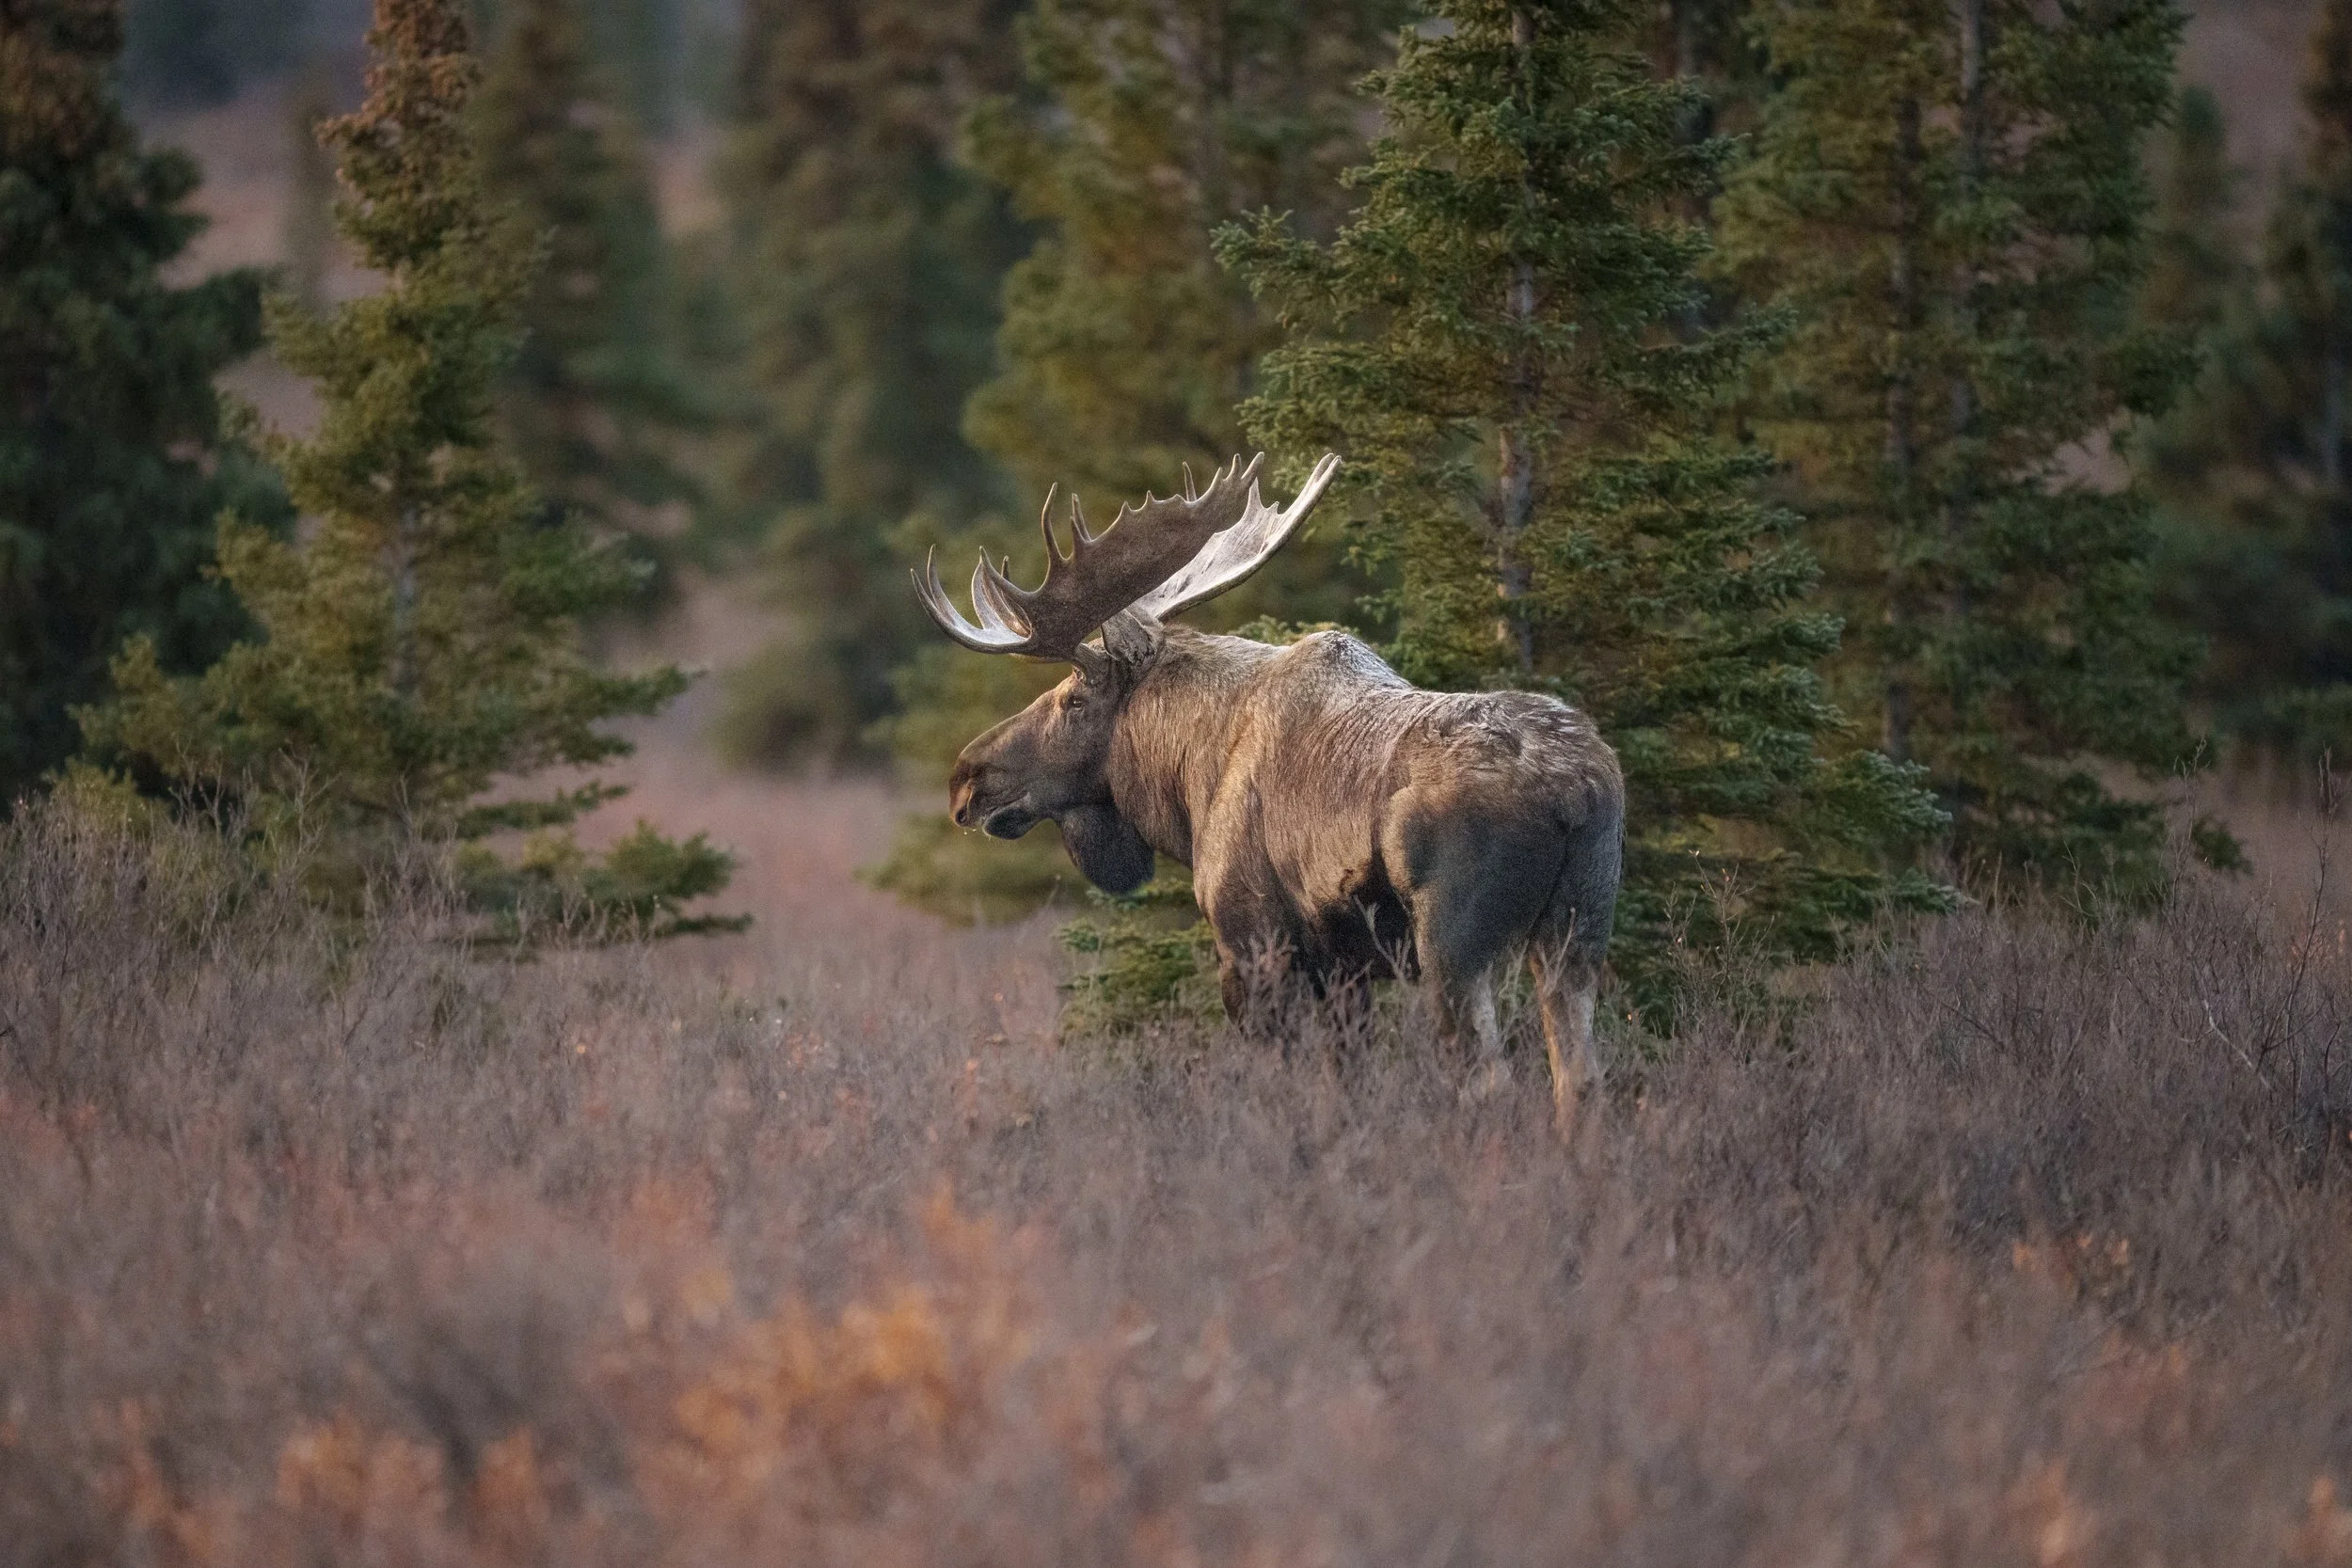
Bull moose in Denali National Park photographed at ISO 20,000 without any AI-based noise reduction or assistance
Next month, I’m teaching a live online workshop called The Art & Science of Low Light Wildlife Photography. We’ll go in-depth on exposure strategies, camera settings, and a no-jargon, easy-to-grasp “how and why” understanding of how this all works.
Plus, I share my real-world examples, photographed exclusively for this topic, so you can see first-hand how this technique works without losing sharpness or detail at high ISO. I have examples from ISO 8,000 all the way up to my ISO 64,000 photo.
The workshop will be recorded and everyone who registers will receive a copy of the recording to keep. So if you can’t make it to the live event, you won’t miss out on any of the content.
Designed for wildlife photographers of all skill levels, this workshop is a master class in exposure, so photographers can bring back the best possible raw files for post-processing.